


Back to Basics: Femoral Artery Access and Hemostasis
Since we have been a “radial first” lab for several years with fewer femoral procedures, one of our newer nurses asked if we could give them a refresher course in femoral access and hemostasis technique. While well aware of the improved safety of radial cath, we also recognize the critical need to teach and perform excellent femoral catheterization. Since femoral access is still the most widely used technique in the United States, I thought it would be helpful to review the basics of access and hemostasis. A complete discussion of vascular access methods for cardiac cath is provided in The Cardiac Catheterization Handbook, 5th edition.1
The starting point: anatomic localization
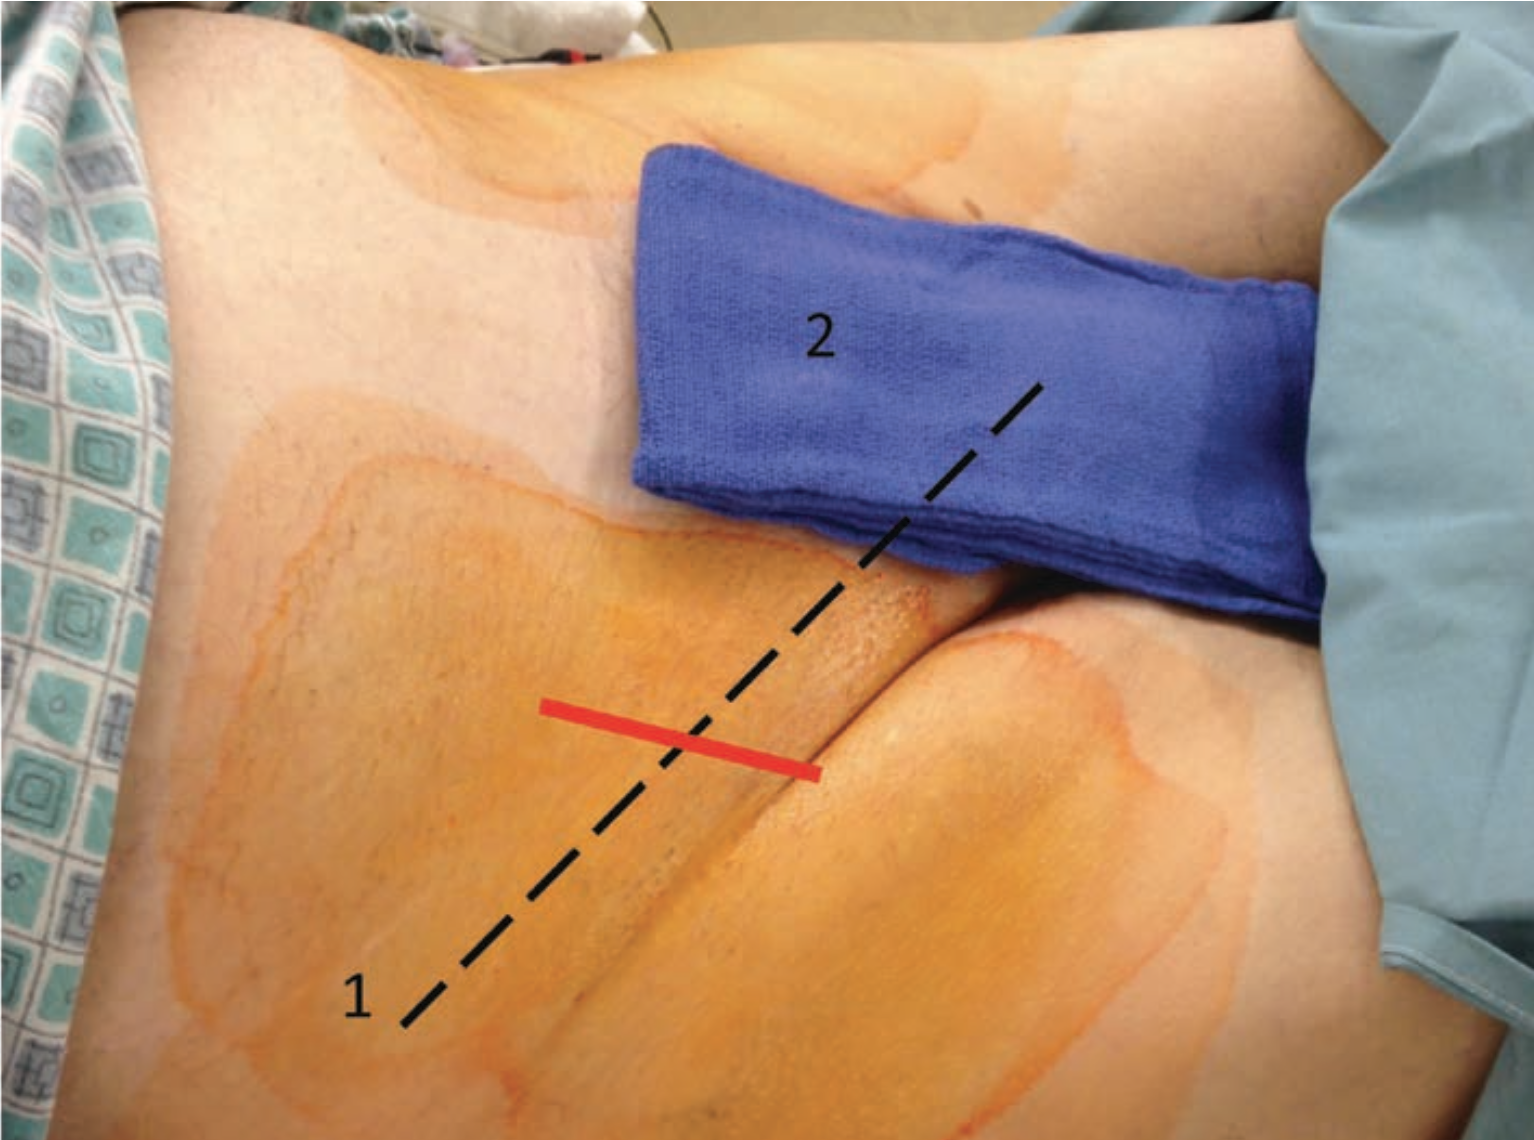
The femoral artery crosses the inguinal ligament at approximately its mid point. Use the bony landmarks of the iliac crest and the symphasis pubis to help define the path of the inguinal ligament. Palpate the femoral artery and place the drape (Figure 1). Although the inguinal (groin) skin crease is usually where the inguinal ligament and femoral artery should be, in some obese patients there may be several skin folds below and above the presumed line of the inguinal ligament, making it at times impossible to locate the access site correctly.
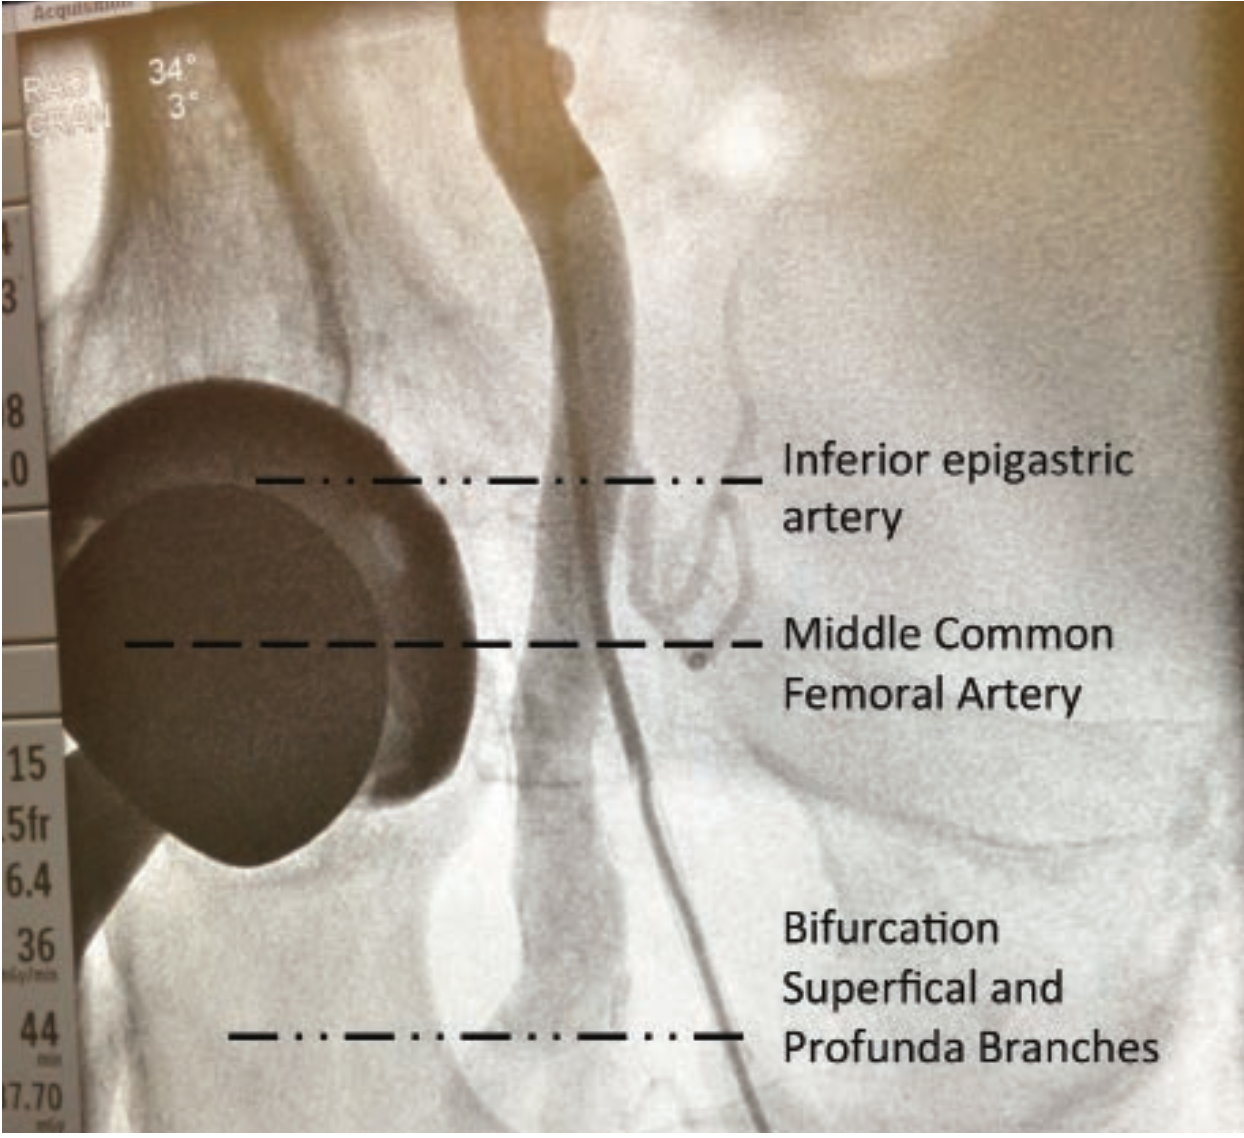
The target for femoral puncture is the mid point of the common femoral artery (CFA), defined as the segment between the inferior epigastric artery, and the bifurcation of the superficial and profunda branches, and is usually at the level of the center of the femoral head (Figure 6).
Before puncture, chart the course and direction of the artery. The femoral artery is felt as a cylinder or tube, with the center line as the highest point, with the edges of the tube lower on each side. The femoral artery pulse is thus located (Figure 2). Local anesthesia is given next (see The Cardiac Catheterization Handbook, 5th edition, page 51).
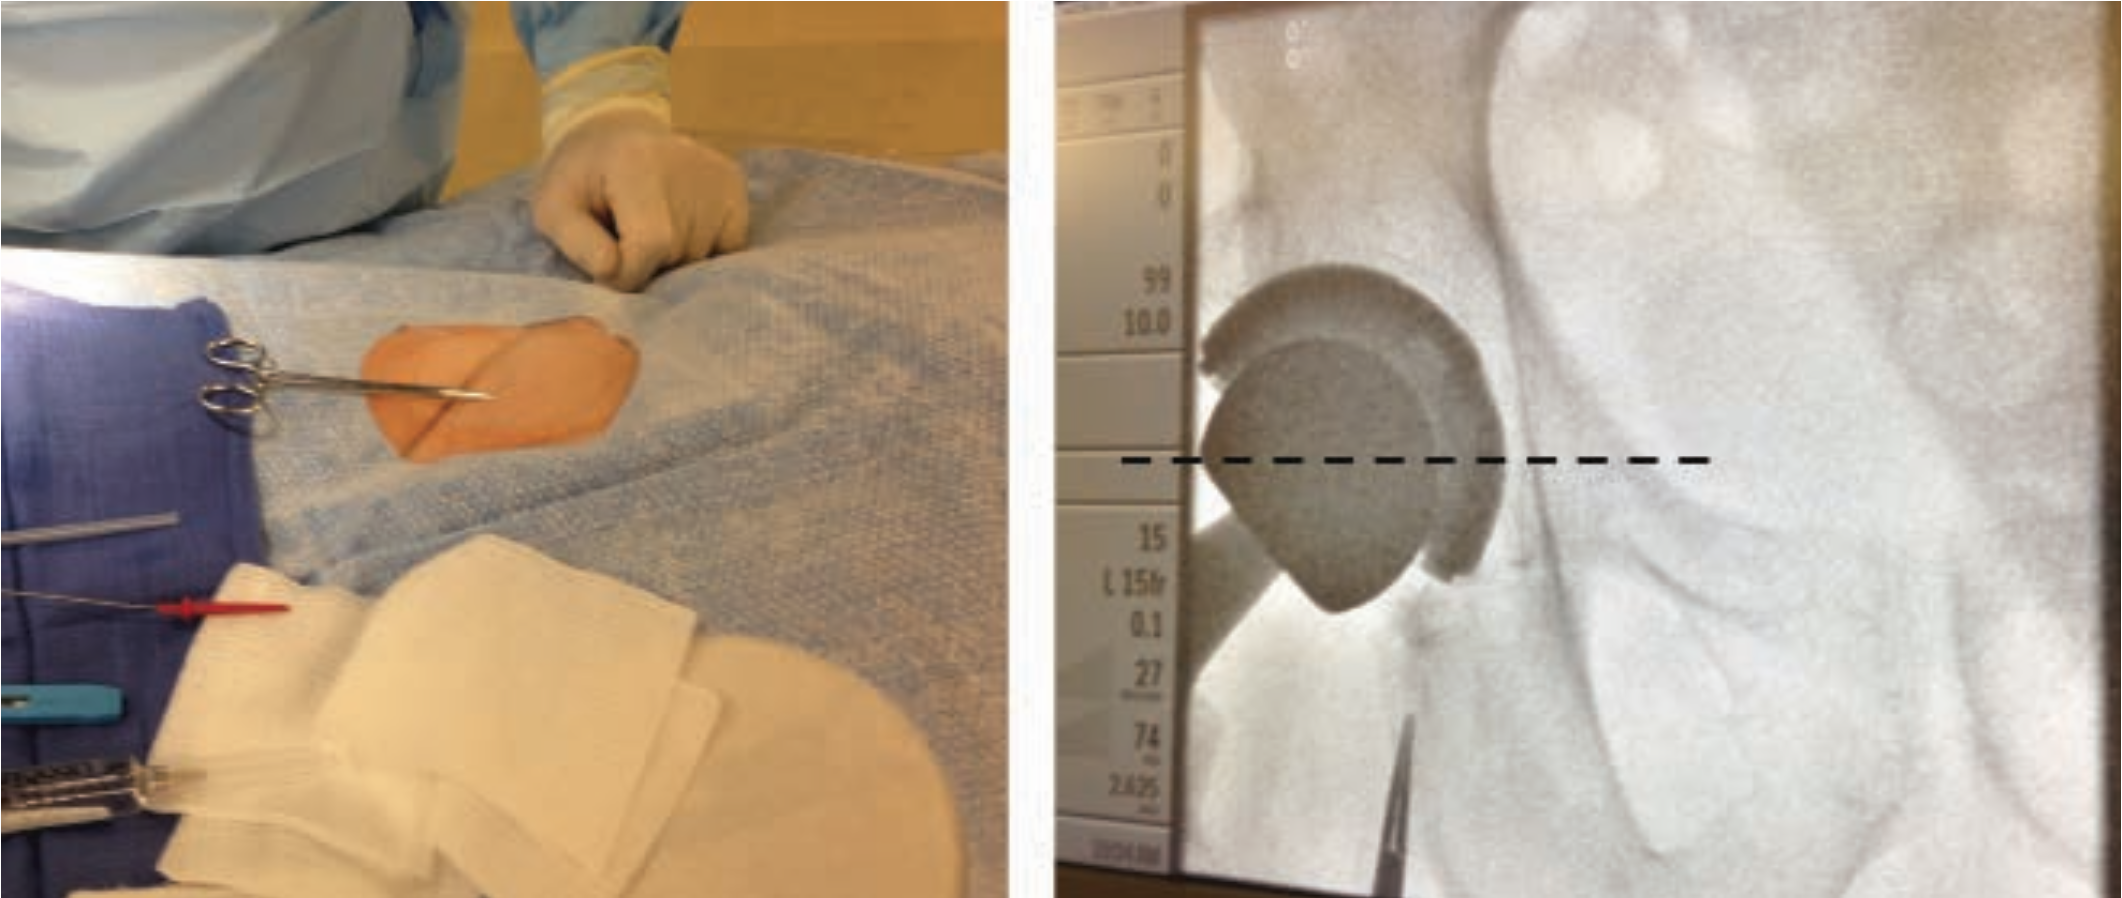
For improved accuracy, place a metal clamp over the proposed entry site and perform a quick fluoro exam to confirm the relationship of the clamp to the femoral head (Figure 3). The needle can then be positioned slightly more caudal or cranial for best puncture. By angling about 30 degrees from the horizontal, the needle will enter the artery higher than the skin entry site.
Access track preparation
Once the artery is punctured, most operators in our lab prefer to nick the skin with a #11 blade over the needle or guide wire, then enlarge the entry track with a clamp (Figure 5). For large-diameter sheaths or in anticipation of vascular closure devices, a subcutaneous tunnel is helpful for easier device insertion and it permits blood to exit to the surface instead of accumulating in the leg. Avoid extensive disruption of skin and subcutaneous tissue, which are natural barriers to infection.
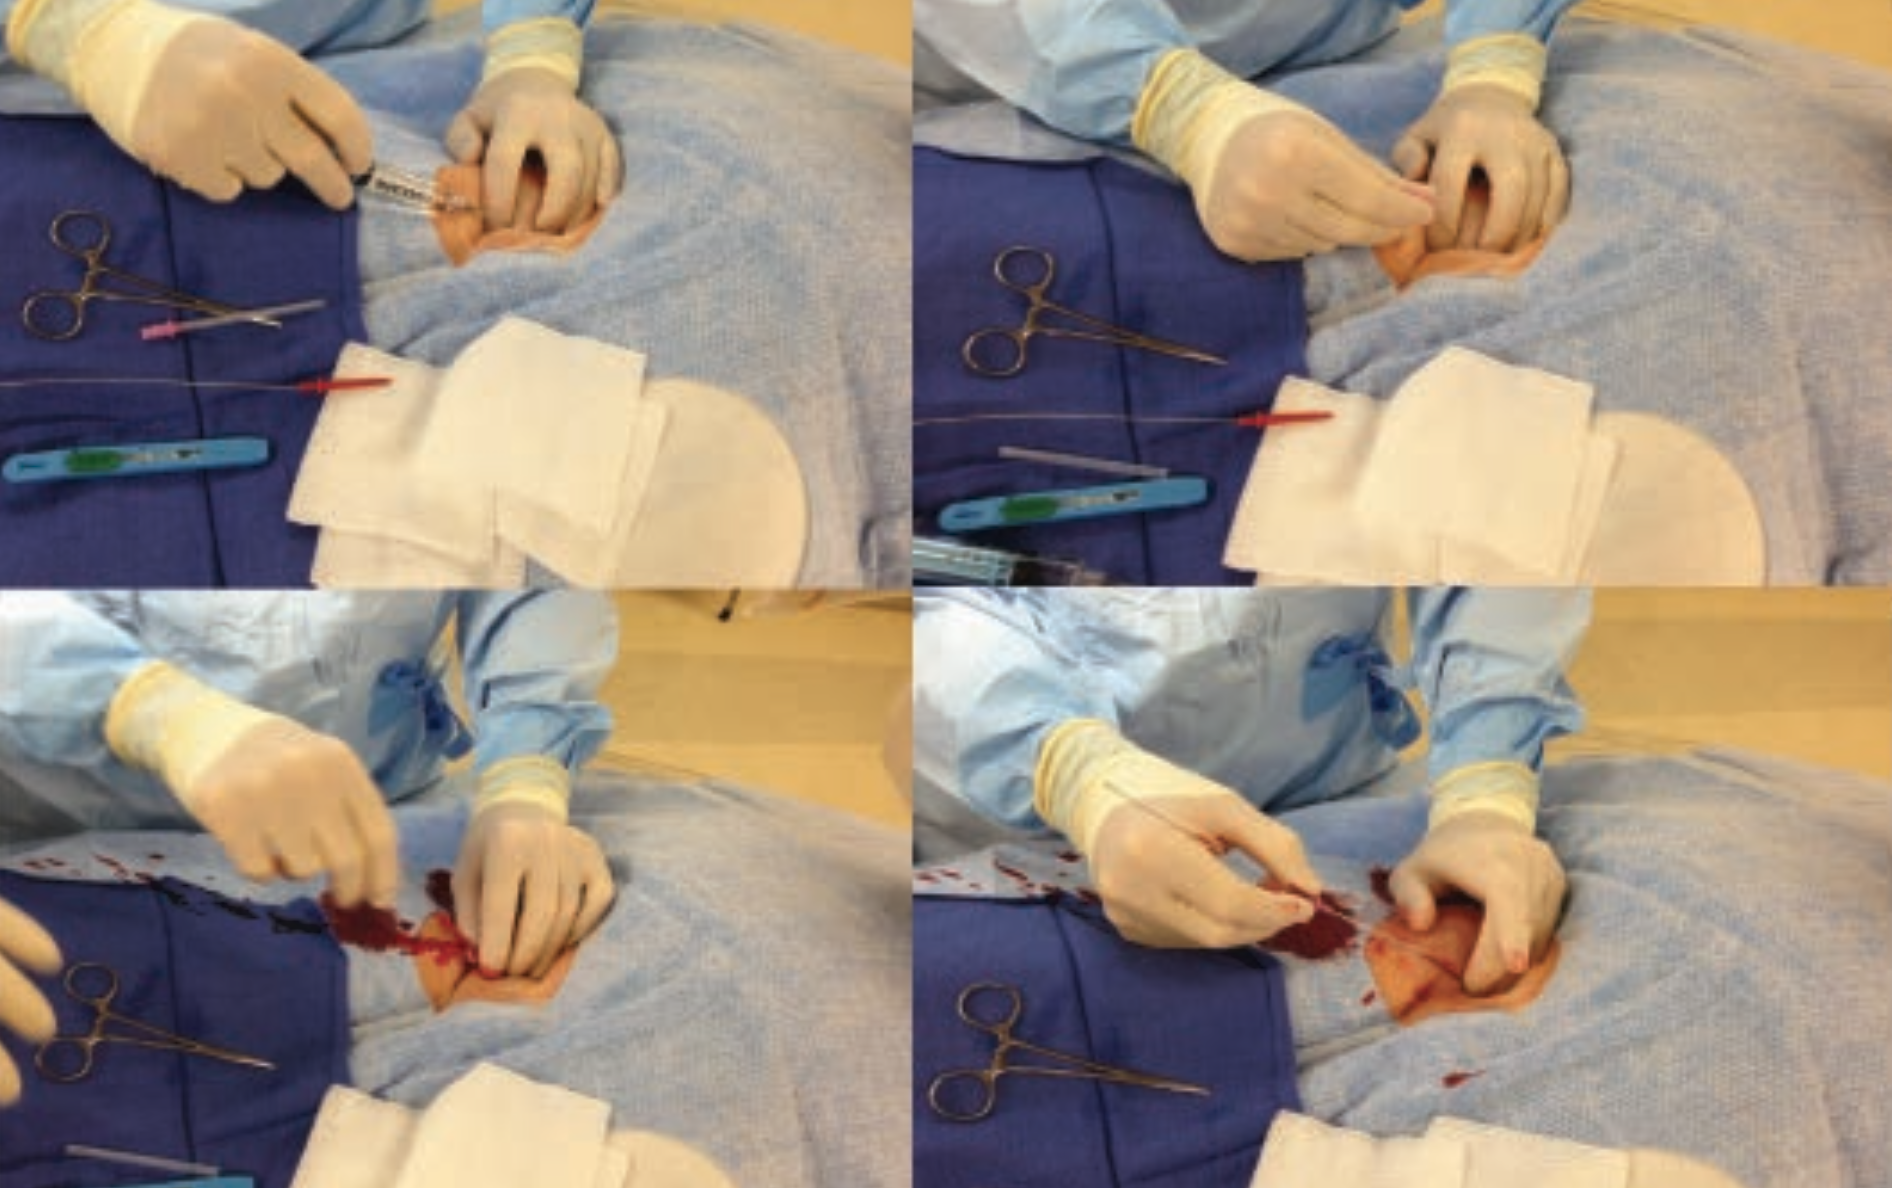
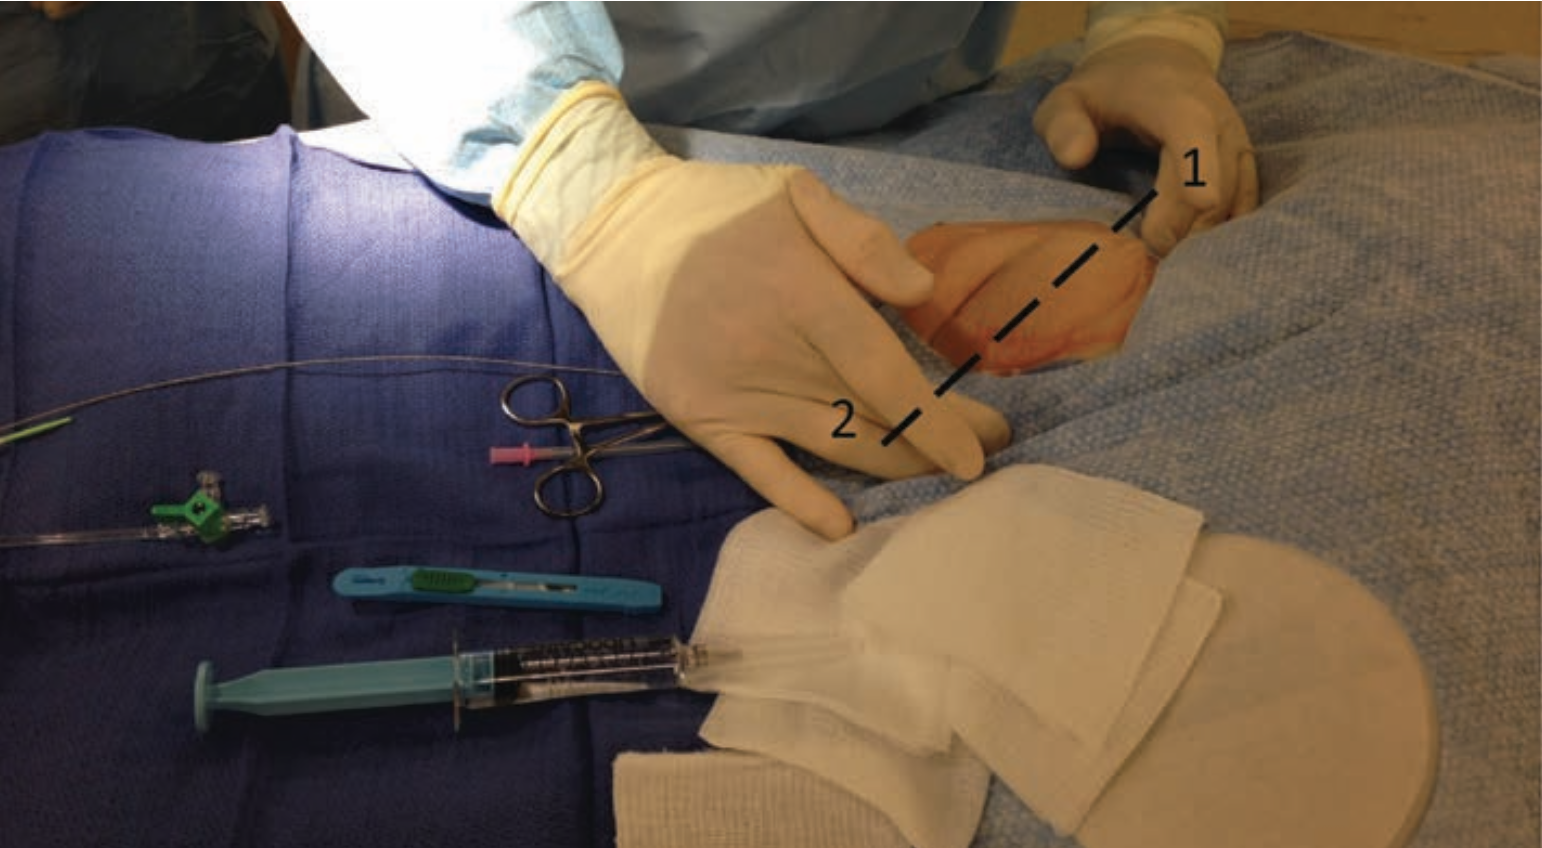
Unlike the radial technique, which often uses a through-and-through puncture technique, a single, front wall arterial puncture is the preferred technique for the femoral approach to reduce the chance of bleeding from an inadvertent back wall puncture leak. With the bevel of the needle facing up, the needle is advanced slowly toward the artery. The immediate spurt of pulsatile blood is followed by the introduction of a J-tipped guide wire, which is advanced gently into the artery (Figure 4). If wire resistance is encountered, the wire is pulled out and the needle redirected. Fluoroscopy should be used frequently to check smooth wire movement.
In patients who have altered anatomy, obesity, or scarring caused by prior procedures (e.g., peripheral vascular surgery, multiple prior catheterizations, or prior intra-aortic balloon pumps or support cannulae), arterial and venous access may be facilitated with ultrasonic direct visualization using hand-held transducers (Site-Rite, Bard) [See Seto A, Ultrasound guidance for radial access: getting in the first time, CLD May 2012].
Sheath insertion
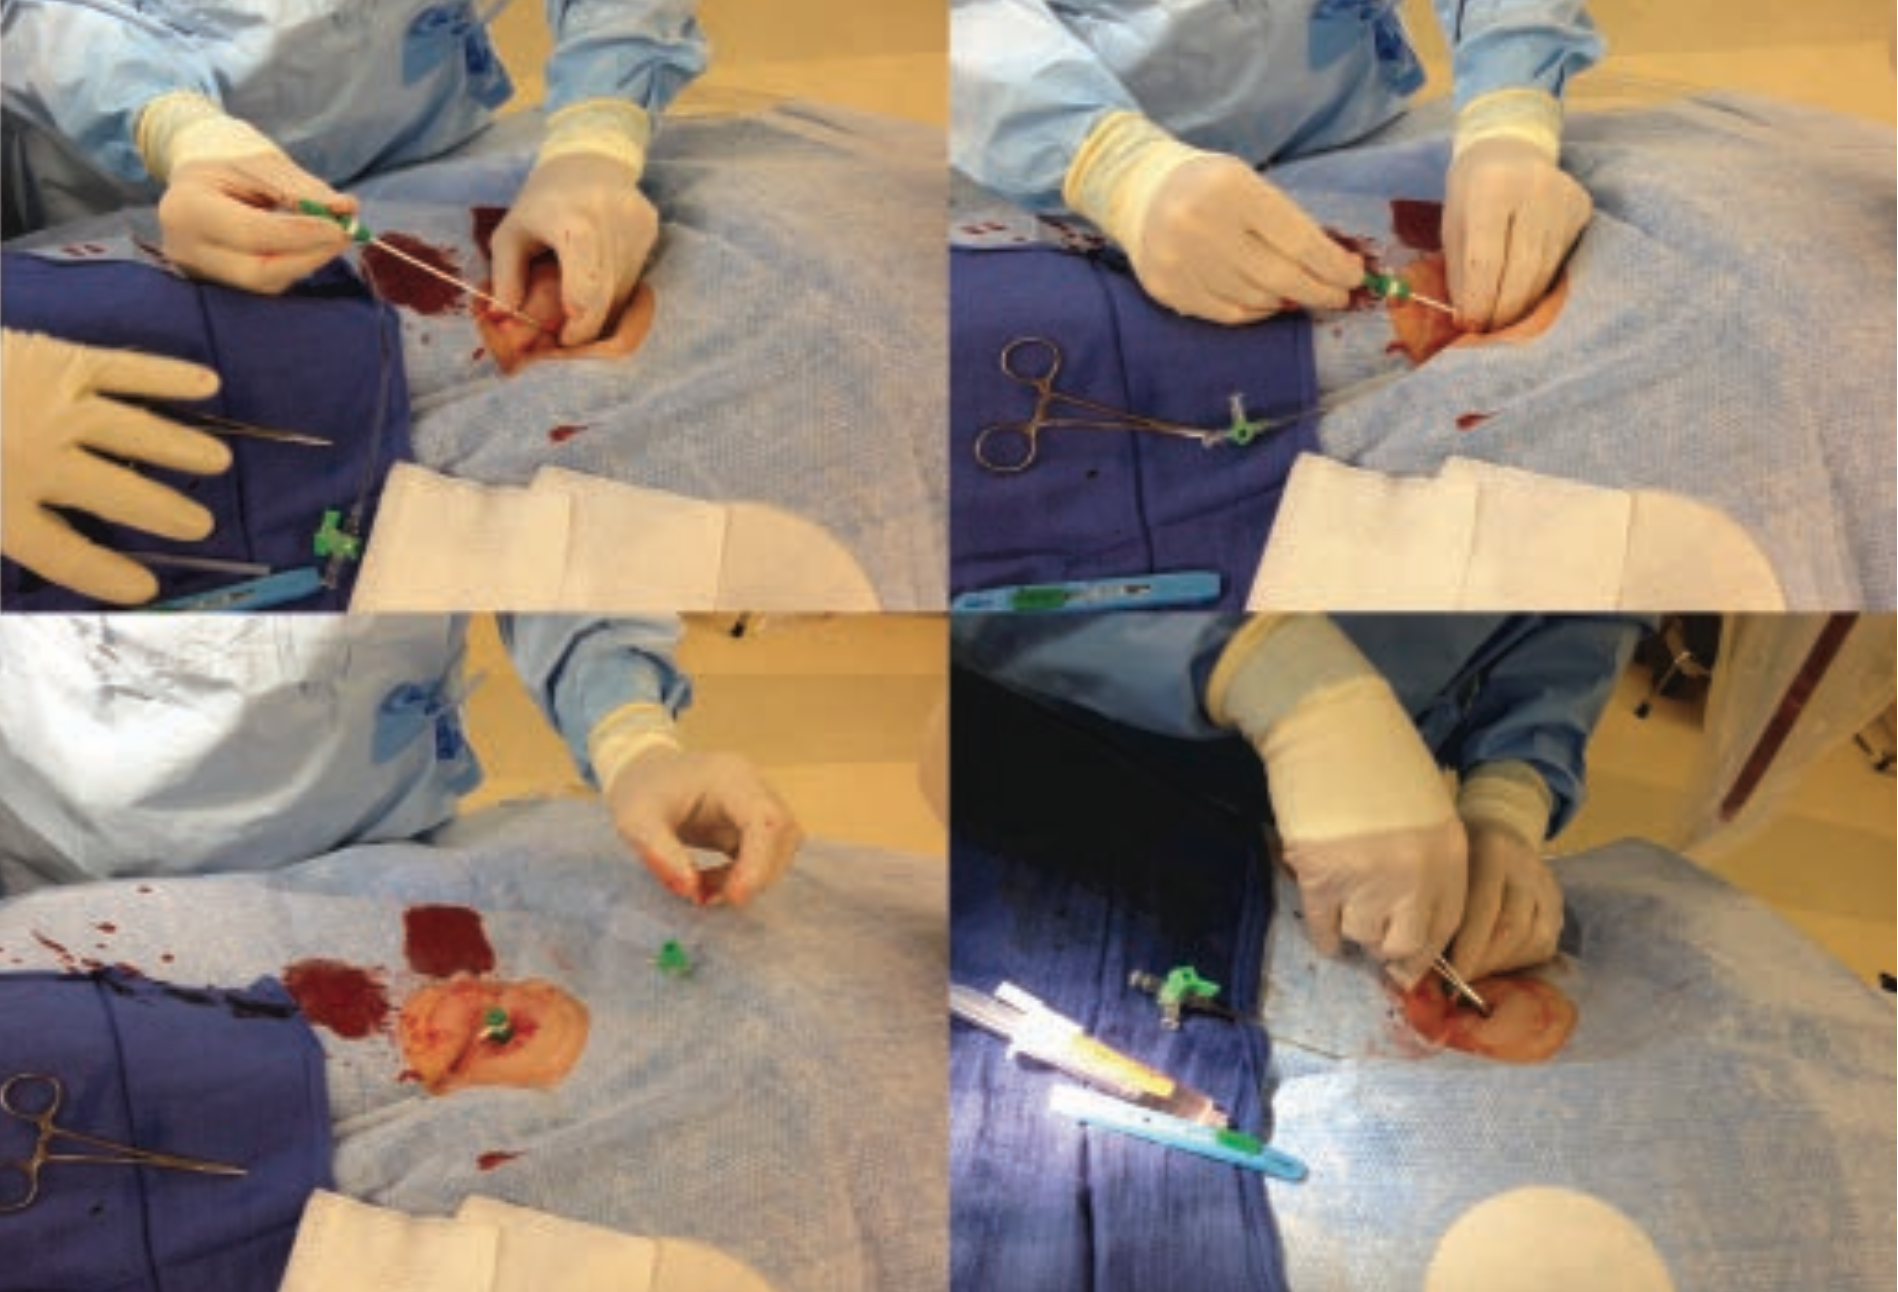
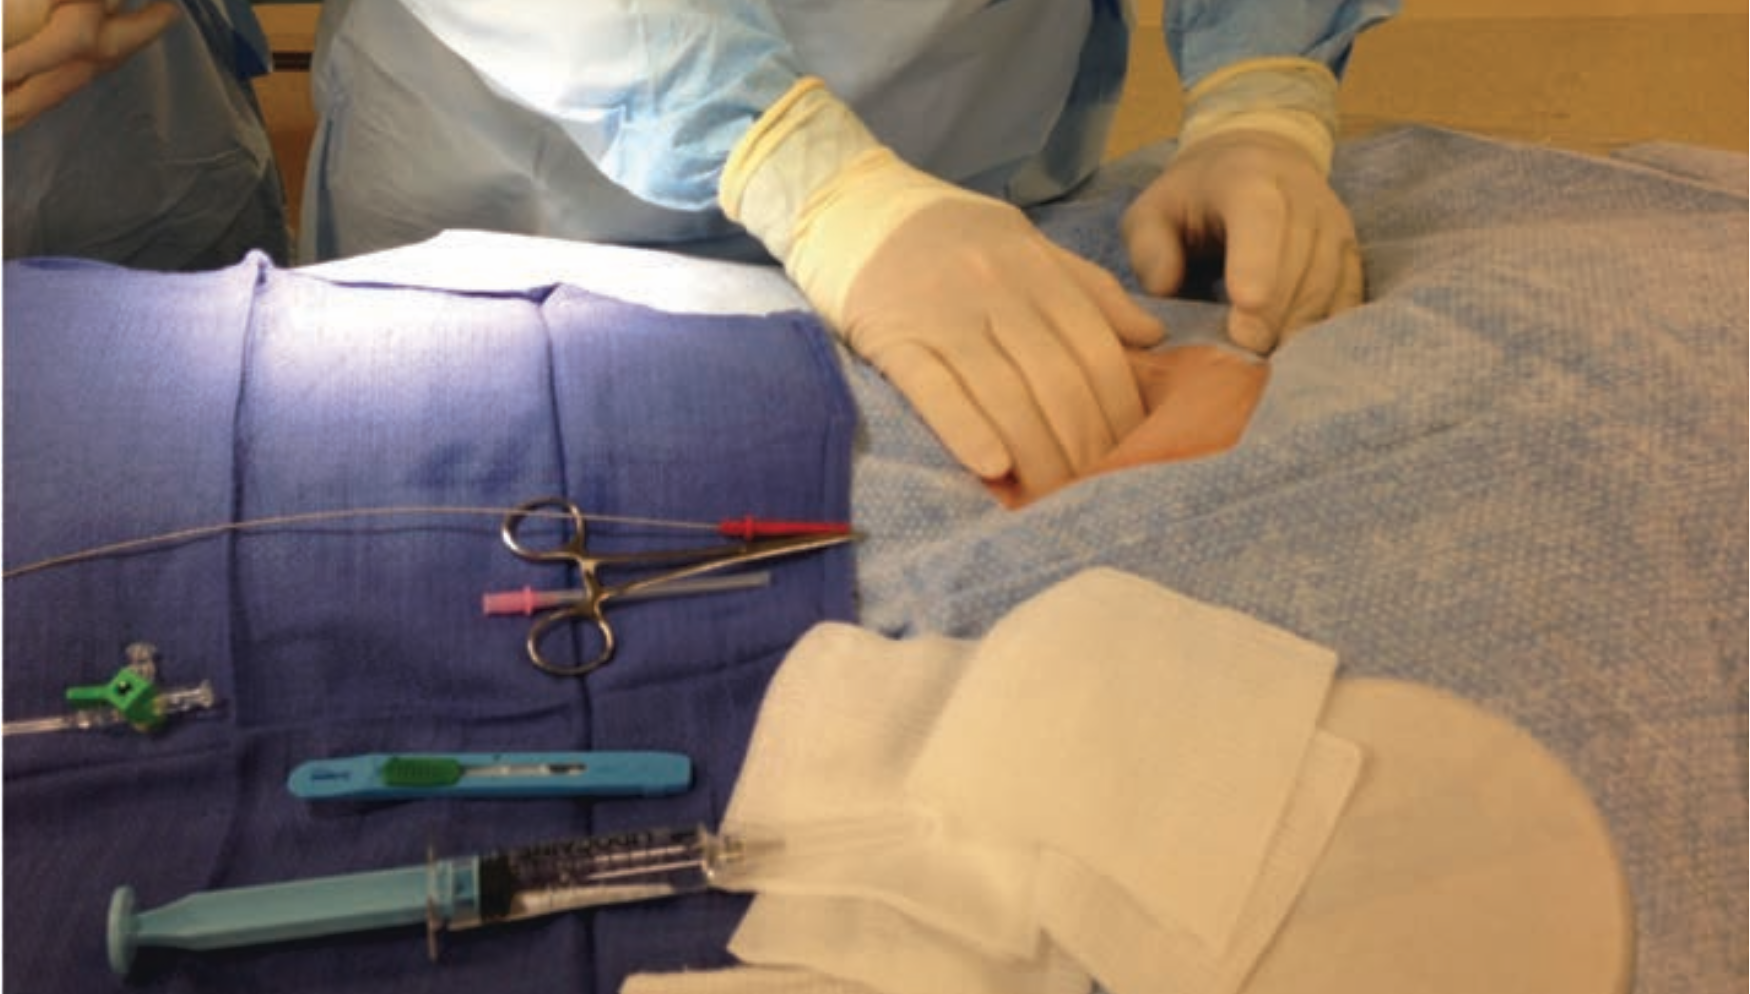
After the guide wire is positioned in the iliac artery, remove the needle with firm hand pressure applied over the puncture site with the last 3 fingers to control bleeding, and the first 2 fingers pinching the guide wire to secure it while the sheath is placed over the wire. The operator advances the sheath-dilator assembly with a rotatory motion while holding the guide wire straight and stable. (Rotational motion reduces forward friction.) The operator then removes the dilator and guide wire together, then aspirates and flushes the sheath through the side arm with heparinized saline (Figure 5). A femoral angiogram is now a routine part of procedure performed before all percutaneous coronary intervention, and either before or after diagnostic angiography, to anticipate any problems of femoral hemostasis (Figure 6).
The patient’s perspective
Thanks to conscious sedation, the patient generally remembers little of the procedure. However, there are four time points when the patient may experience pain: 1) Administration of lidocaine; 2) Arterial needle insertion; 3) Sheath advancement; and 4) Sheath withdrawal and hemostasis. Be aware of each of these moments, and use appropriate sedation and analgesia.
Sheath removal and hemostasis — manual compression
After the catheterization and the patient is stable, the sheath can be pulled on the table, stretcher, or in the recovery area.
When pulling the sheath, first prepare the area; clear away equipment, syringes, and tubing. Consider whether the patient may need more analgesia or local anesthetic. Have gauze ready to clear the blood. Move the drape over the ankle so that one can feel the dorsalis pedis artery pulse. Aspirate and flush the sheath to clear any thrombi. Check an activated clotting time (ACT); if it is > 150 seconds, reconsider manual compression until the ACT drops < 150 seconds. For high ACTs, we may use a vascular closure device, but very rarely do we use protamine sulfate to reverse the heparin effect. Recall that patients receiving NPH (neutral protamine Hagedorn) insulin may be at higher risk for a protamine reaction.1
Manual compression technique
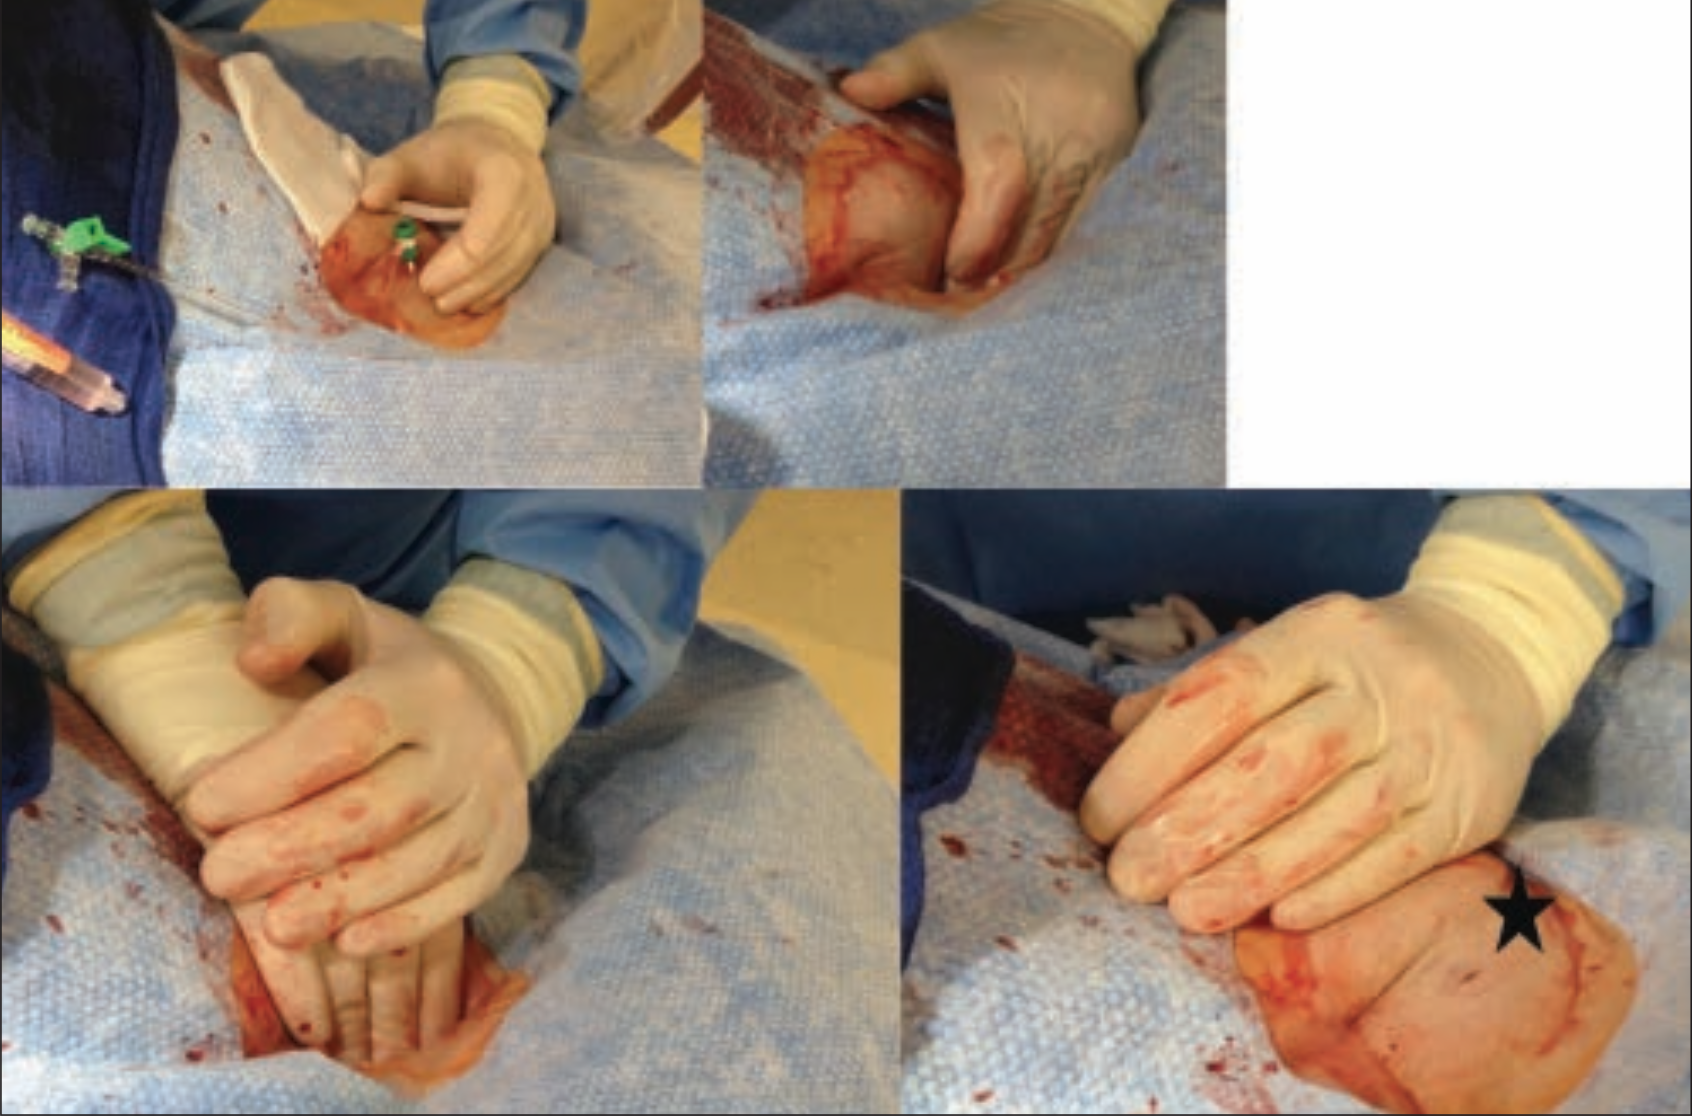
To remove the sheath, the operator places left-hand fingers over the femoral artery, an inch more cranial (toward the patient’s head) than the skin incision (Figure 7). The operator applies gentle pressure and removes the sheath, taking care not to crush the sheath and “strip” clot into the artery. Allow a small spurt of blood to purge the track of retained thrombi. Then apply firm downward pressure for 15 to 20 minutes (5 minutes of full pressure, 5 minutes of 75% pressure, 5 minutes of 50% pressure, and 5 minutes of 25% pressure). Patients receiving antiplatelet treatment may need more compression time.
During compression, the pedal pulses are checked every 2 to 3 minutes. A diminished pulse is acceptable during brief full-pressure application, but the distal pulses should not be obliterated completely. If the pedal pulse is absent during compression, the pressure over the artery should be decreased periodically to allow distal circulation. Complete artery occlusion prevents clotting factors and platelets from being deposited at the arterial wall puncture site.
Firm three-finger pressure should control most femoral bleeding. A rolled gauze pack may be placed over the artery to the groin, and pressure applied with the palm of the hand. Standing on a short stool at bedside permits the operator’s upper body weight to be used for pressure application. In patients with low cardiac output, mitral stenosis, or cardiomyopathy with a small pulse pressure, the femoral artery can easily be obliterated. In these patients, the distal pulses should be checked more frequently and less pressure should be applied to the groin.
During the time pressure is being applied to the puncture site, the nurse or physician can discuss the clinical findings and review the post-catheterization instructions with the patient.
Hematoma monitoring
After compression, observe the site for 5 minutes to see if there is good hemostasis. Re-compress if there is a hematoma or signs of bleeding. Recheck again in 5-10 minutes and consider application of a suitable pressure dressing (see external compression devices, below).
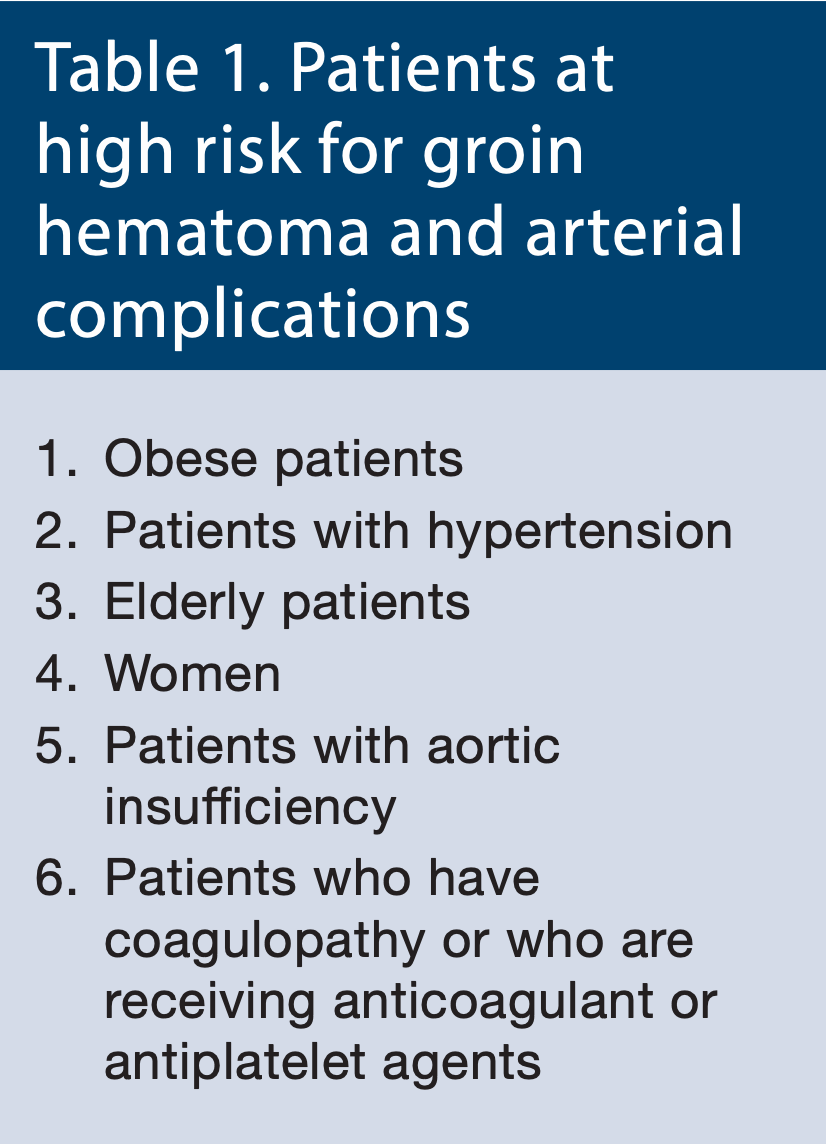
Patients at high risk for groin hematoma and arterial complications who may need longer pressure application, or who may benefit from the use of a vascular closure device, are listed in Table 1. In some patients (e.g., obese), > 500 ml of blood can be lost before the patient or nurse identifies a problem. For this reason, a large, opaque, occlusive dressing over the puncture site is not recommended. The puncture site dressing should be a clear, plastic, waterproof, sterile dressing (e.g. Opsite, Smith & Nephew) which permits visualization of the entry and surrounding tissues. Do not use gauze under the plastic dressing, as this may form a culture media when combined with blood, especially if left in place after discharge.
External compression devices
In considering ‘suitable’ pressure dressings, weighted sandbags are ineffective in preventing bleeding, and they obscure the puncture site so that hematoma formation may be missed. Some laboratories employ mechanical C-type clamps to assist in puncture site hemostasis. The clamp is effective, but must be applied carefully by a trained individual and the patient must be monitored frequently for misalignment of the clamp and puncture site, bleeding, or excessive pressure with limb ischemia.
The FemoStop compression device (St. Jude Medical) is an air-filled clear plastic bubble that molds to skin contours. It is held in place by straps passing around the hip. The FemoStop is used most often for patients in whom prolonged compression is anticipated or whose bleeding persists despite prolonged manual compression. The duration of FemoStop compression and time to removal of the device varies depending on the patient and staff protocols.
Vascular closure devices
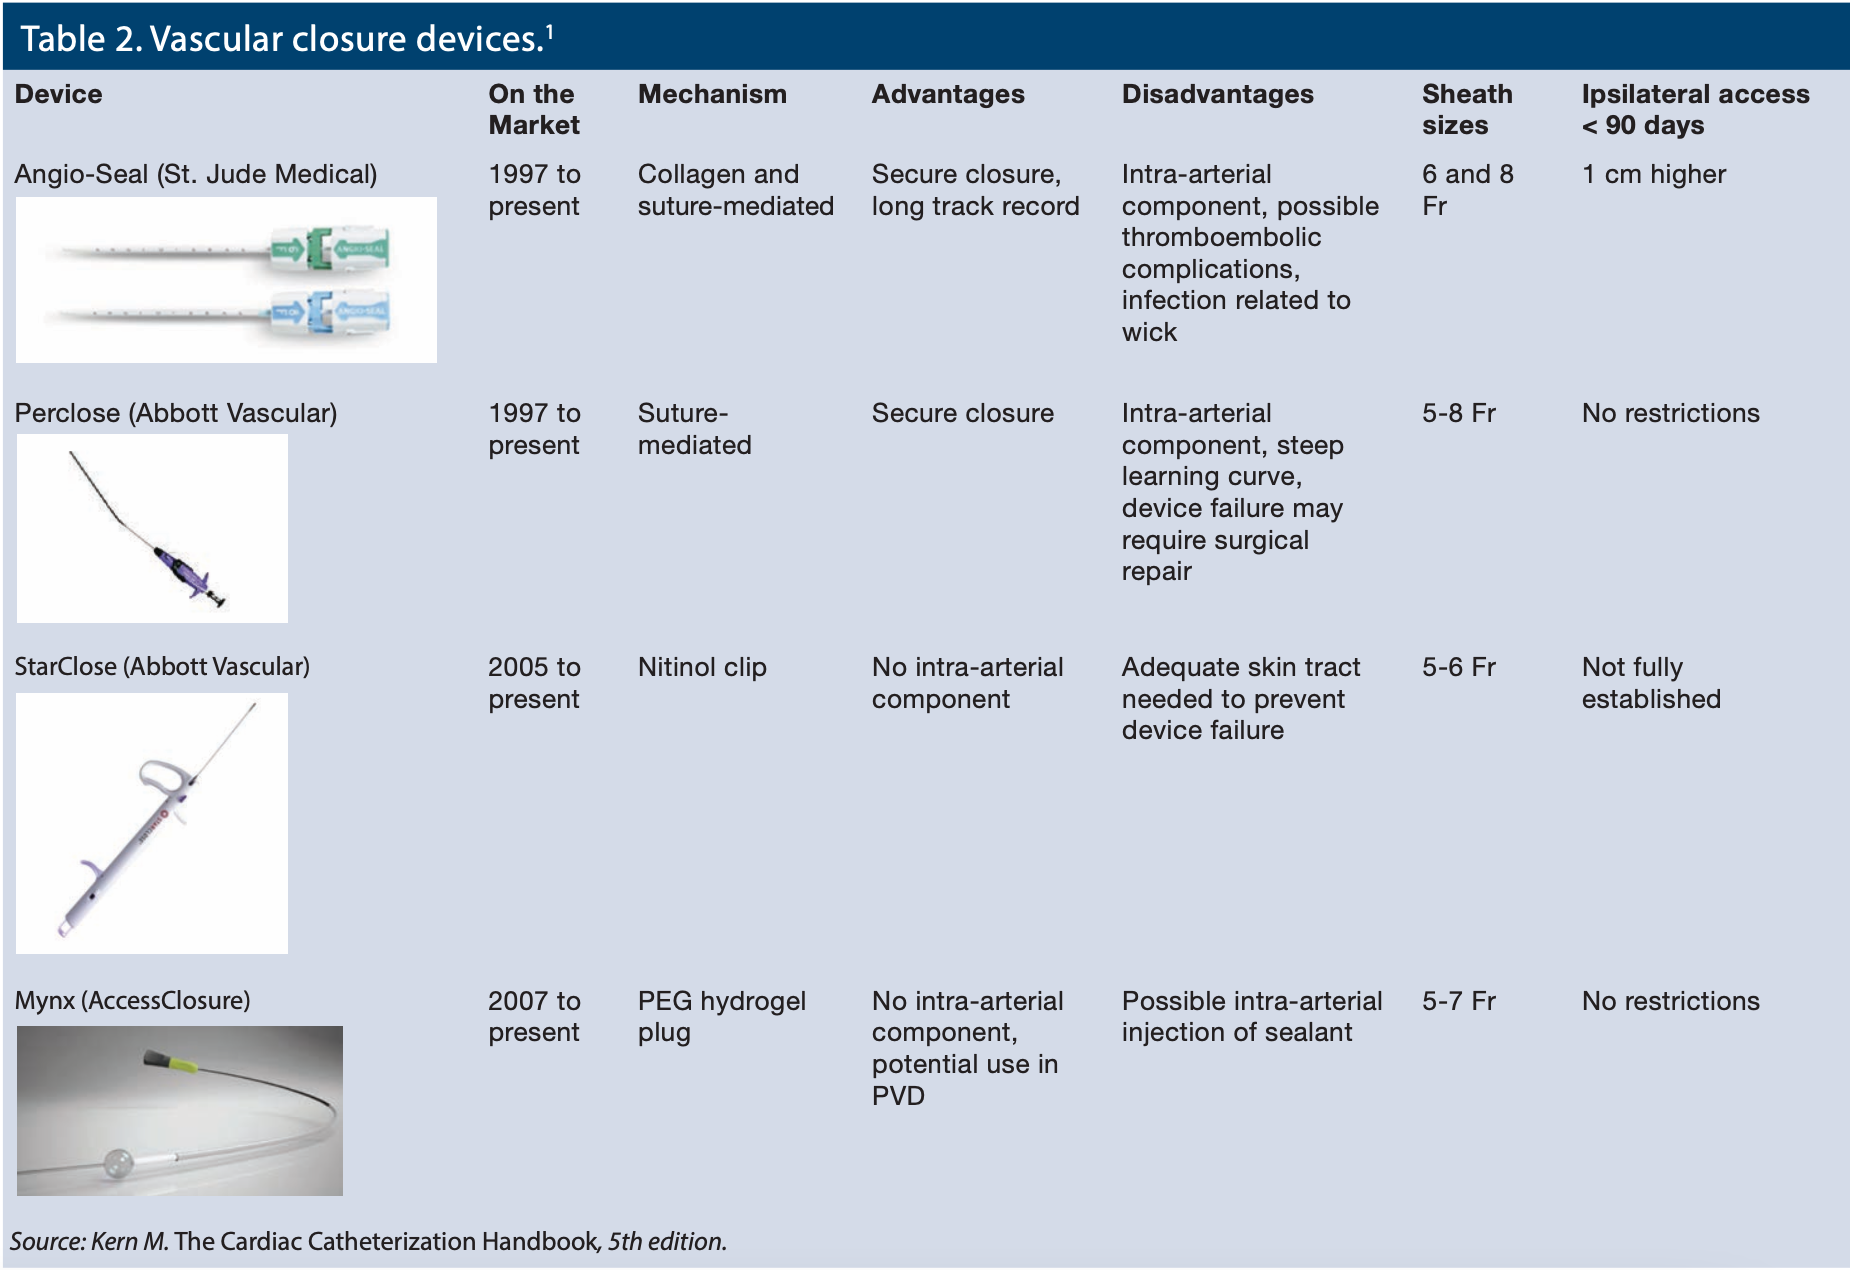
Most labs now use one or more of several different types of vascular closure devices (VCDs) to produce more secure hemostasis, earlier patient ambulation and comfort, and remove the nurse or technologist from the chore of manual compression. All VCDs reduce the time to obtain hemostasis. Each device has its own unique insertion technique, failure mode and complications, a subject addressed in detail elsewhere.2 The advantages and disadvantages of the several common arterial closure devices are summarized in Table 2.
Femoral vein and artery: which one to remove first?
If the femoral artery and vein are both cannulated for the procedure, the operator should ensure arterial hemostasis first, and then remove the venous sheath. This approach decreases the risk of arterio-venous fistula formation and also provides a useful means of treating a vagal reaction should the peripheral IV inadvertently be lost.
Bottom line
After reviewing the method of femoral access and hemostasis, I hope our patients needing femoral access will benefit from an excellent and complication-free procedure. After reading about femoral problems and the bleeding risks again, I also feel strongly that many of us will be reinvigorated by the advantages of the radial approach and continue down the “radial first” road we started on a couple of years ago.
References
- Kern MJ, ed. The Cardiac Catheterization Handbook. 5th ed. Elsevier: Philadelphia, Pennsylvania; 2011: 1-456.
- Schwartz BG, Burstein S, MD, Economides C, Kloner RA, Shavelle DM, Mayeda GS. Review of vascular closure devices. J Invasive Cardiol. 2010 Dec;22(12): 599-607.
TEST YOUR KNOWLEDGE!

