The Bilobed Flap - Critical Analysis and New Mathematically Precise Design
© 2024 HMP Global. All Rights Reserved.
Any views and opinions expressed are those of the author(s) and/or participants and do not necessarily reflect the views, policy, or position of ePlasty or HMP Global, their employees, and affiliates.
Abstract
Background. A bilobed flap is a workhorse flap to reconstruct the lower third of the nasal defect. It has been described as a double transposition flap. Various changes have been proposed to reduce the drawbacks of this flap. Most of the modifications pay attention to flap width and length without emphasizing the pivot point. In this article, the classic Zitelli design is tested for its mathematical precision, and the key role of the pivot point is discussed.
Method. The bilobed flap was designed with accurate mathematical measurement on simple drawing software. Its design and flap movement were studied and critically analyzed. The biogeometry of the flap was investigated with multiple diagrams and various mathematical principles.
Results. The classic description carries some mathematical errors. The author describes a new design that is more precise mathematically. A proper pivot point location is vital for accurate design and flaps movement. Putting the pivot point at a distance 2.6 times the radius of the defect makes the movement of the flaps precise. In a proper design, the extension of secondary flap length is an optional step, and the dog-ear so formed can be tackled separately. This new design of the bilobed flap only needs rotation advancement movement.
Conclusions. The bilobed flap is one of the major tools for lower third nasal reconstruction. A perfectly designed bilobed flap is primarily a rotation flap. A slight modification of classic design by putting the pivot point at a distance 2.6 times of the radius of the defect makes it more perfect mathematically.
Introduction
A bilobed flap is a double transposition flap. In this method, a circular defect is covered by transposing a primary flap, and a secondary flap is used to cover the defect caused by the primary flap. In 1918, Esser described the bilobed flap for nasal reconstruction, and since then, its main application has been for coverage of lower third nasal defect. It has also been used for various defects of the upper nose, cheek, trunk, and sole of the foot.1,2
In the original design of the bilobed flap, there were 2 transposition flaps (Figure 1). Each flap had to move 90°, making the total arc of rotation 180°. It was associated with a pin-cushioning effect, trap door deformity, and a significant standing cutaneous deformity (dog-ear).1 To reduce the standing cutaneous deformity, excision of a wedge of skin (Burrow's triangle) was proposed, but it risked the flap vascularity. Wide undermining around the flap as well as the recipient area was also described to reduce the pin-cushioning. In 1989, Zitelli refined the design of the bilobed flap and reduced the angle of transposition to 45°to 50° for each flap; thus the total arc of rotation became 90°to 100°.3
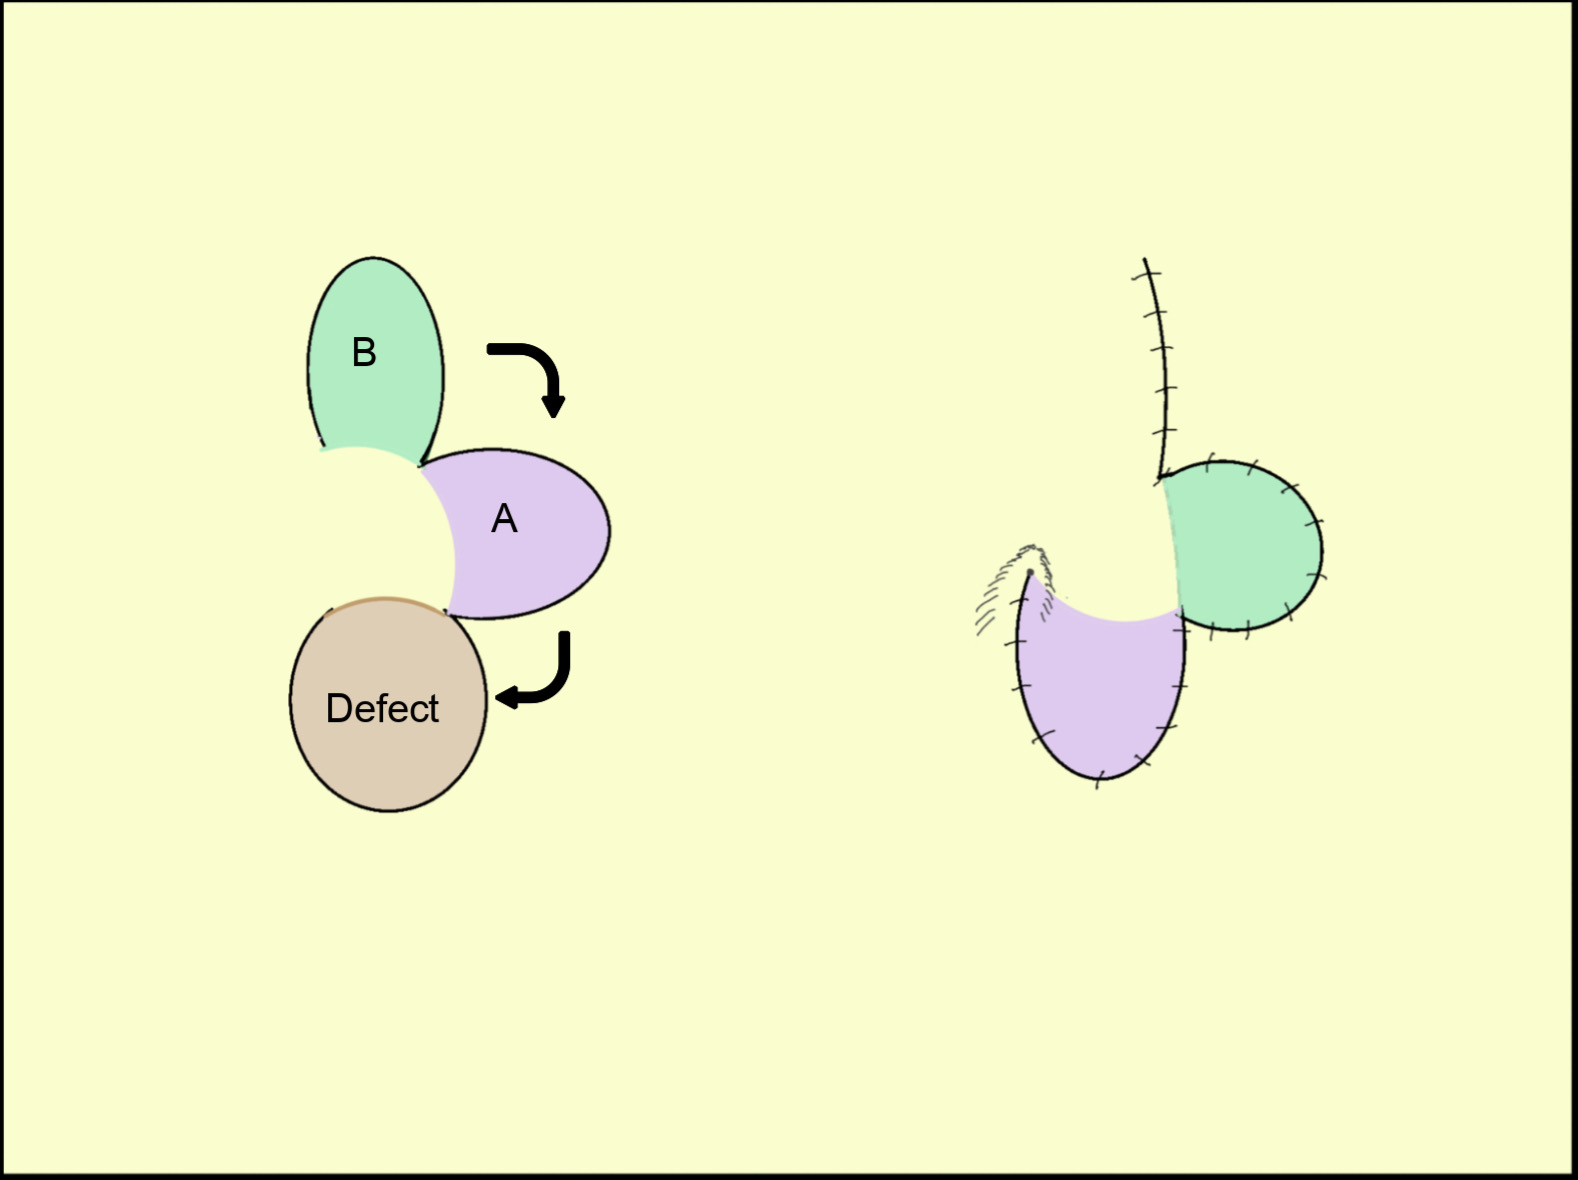
Figure 1. A simplified illustration of the design of the Esser bilobed flap. Note 2 transposition flaps with each flap moving 90°.
The pivotal restraint phenomenon, as described by Duzubow, also holds true for the bilobed flap.4 This pivotal restraint causes effective shortening of the flap during transposition and leads to some tension in the closure. Various modifications have been proposed and added to the classic Zitelli design to address these problems and most, if not all, concentrate only on flap length and width alteration.5-7 The pivot point in most of the description remains the same, ie, at a distance equal to twice the defect radius.
In this article, the classic design of the bilobed flap is analyzed mathematically, and the resultant flap movement is assessed. Also, a new design is proposed based on certain mathematical principles with an emphasis on the proper location of the pivot point.
Materials and Methods
In this study, the bilobed flap was designed according to the classic description on a computer using simple drawing software. Due care was given to precise measurements. The resultant flap and its design were analyzed. By using the software, the flap was transposed into the defect. The flaps movements and the final flaps positions were studied.
A classic bilobed flap (without exact measurement)
The classic description of a bilobed flap is depicted in Figure 2 (without exact measurement). The steps for planning a bilobed flap8 are:
-
- The circle 'A' represents a circular defect with 'r' radius. The center of the defect is marked with a point 'a.'
- A point 'D' is marked at a distance twice that of the radius from the center of the defect (a), and the line 'aD' is drawn [aD = 2r].
- From the point 'D,' a perpendicular line 'DE' is drawn.
- Now from the point 'D,' an arc 'Y' is drawn with a radius of 2r passing through the center of the defect.
- A line 'DF' is drawn at a 45-degree angle, bisecting the angle between the 'aD' and 'DE' lines. It intersects with the arc 'Y' at point 'b.' This point 'b' will be the center of the primary flap.
- From this point 'b' a circle is drawn with a radius equal to the radius of the defect (r), and it represents the primary flap.
- The secondary flap is planned with its center 'c,' the intersecting point of arc 'Y' and 'DE' line. The secondary flap is slightly longer to facilitate primary closure, and its width is usually kept slightly smaller than the primary flap.
The transposed flaps and final closure are also depicted in Figure 2.

Figure 2. An illustration of the classic design of the Zitelli bilobed flap without exact measurements. (A) Circular defect with 'r' radius. (B) The pivot point is located at a 2r distance. (C) Two flaps are planned. (D) Incision includes a triangle of skin near the defect, which will be discarded. (E) Flap inset. (F) Final scar line.
A classic bilobed flap (with exact measurement)
If we redraw the bilobed flap with the steps mentioned above along with exact measurements, the flap outline will look like Figure 3. For mathematical analysis, two more arcs, 'X' and 'Z,' are drawn from the center 'D' that touches the inner and outer limits of the defect, respectively. Various points of intersection of arcs 'X', 'Y,' and 'Z' with the defect and both flaps are marked as shown in the diagram. In proper mathematical planning, the primary flap will overlap the defect and the width of the secondary flap will be half of the primary flap.
Figure 3. An illustration of the classic design of the Zitelli bilobed flap with exact measurements. (A) Circular defect with 'r' radius and the pivot point is located at 2r distance. (B) Overlapping of primary flap and defect is evident. The secondary flap is too narrow in width.
A transposition flap
For a better understanding of the biogeometry of the bilobed flap, the transposition flap also needs consideration. In a transposition flap, the pivot lies away from the defect (Figure 4) and the pivot point does not move during transposition. Therefore, if the bilobed flap is a transposition flap, then the pivot point should be 'c3,' which is away from the defect.
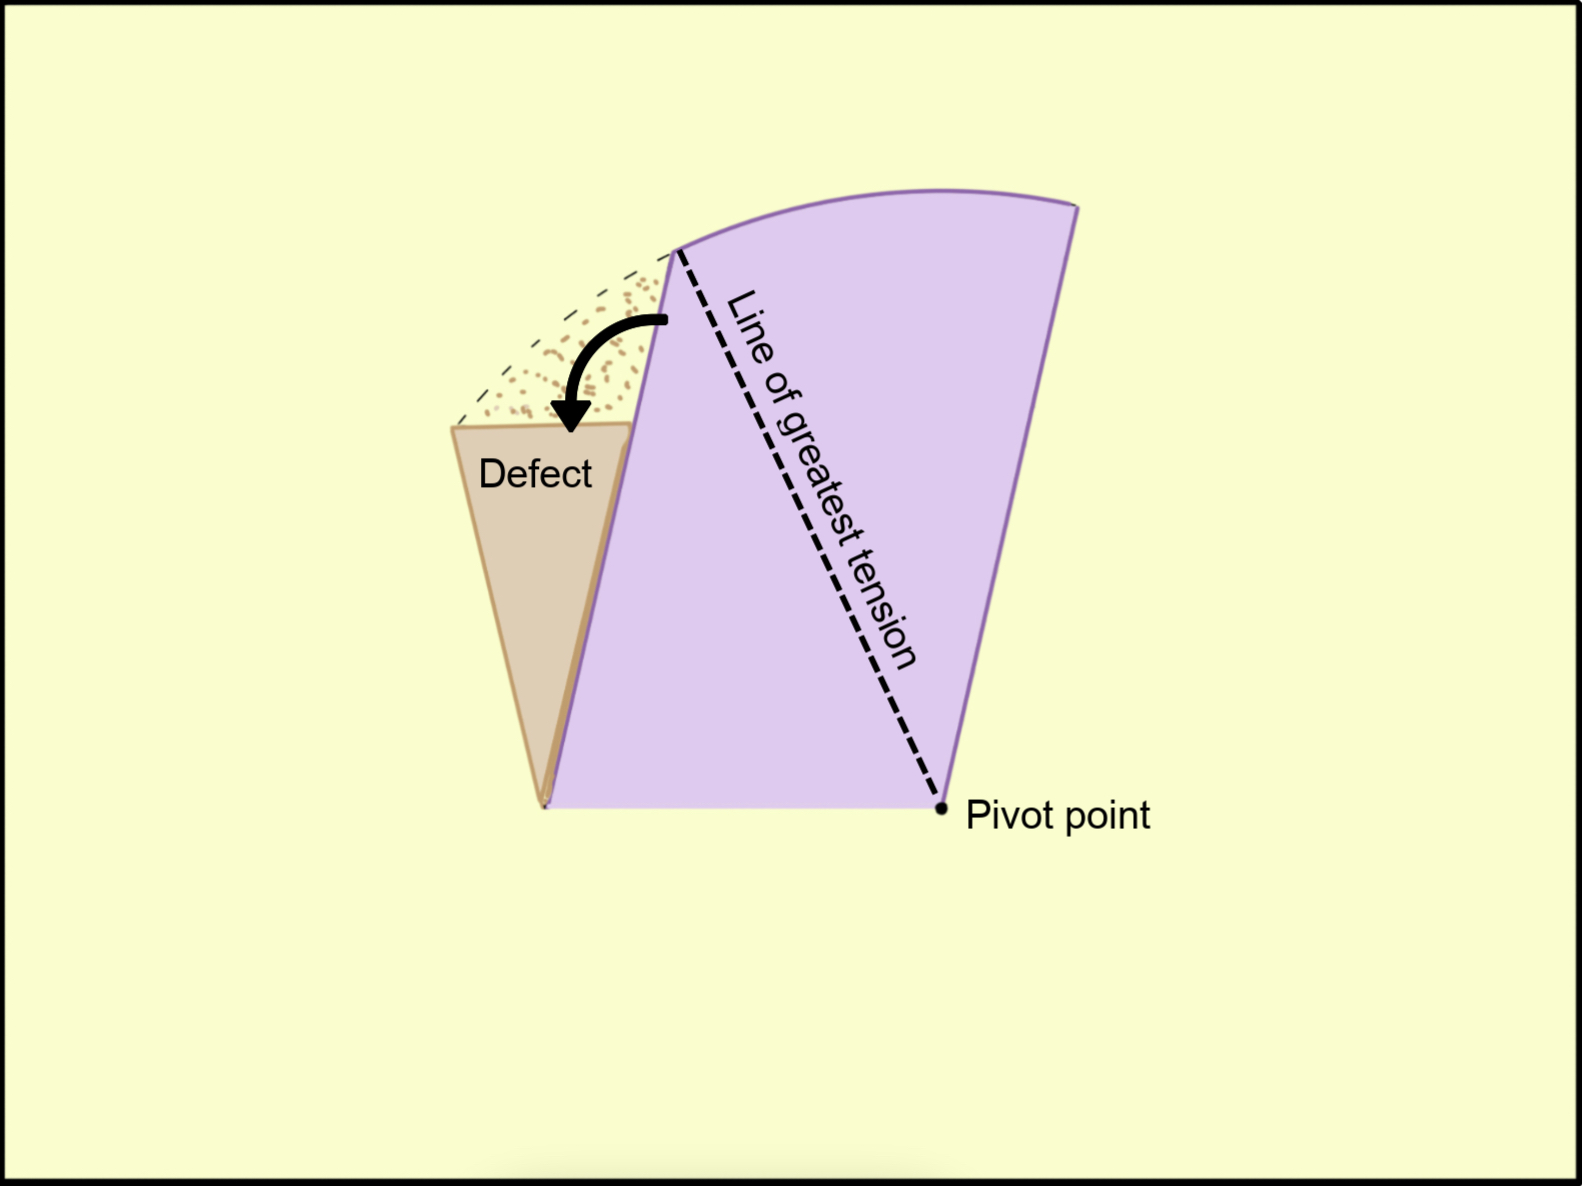
Figure 4. A transposition flap with its pivot point.
Closure of an elliptical defect
Another important point relevant to the bilobed flap is the principle of closure of an elliptical defect. In Figure 5, a circular defect is made within an ellipse and has a diameter (d) equal to the width of the ellipse. It is well known that to avoid dog-ear deformity, the length of the ellipse should be at least 3 times its width (ie, 6 times its radius). Similarly, for a semicircle the desired length of the hemi-ellipse is 1.5 times the width (1.5d = 3r).
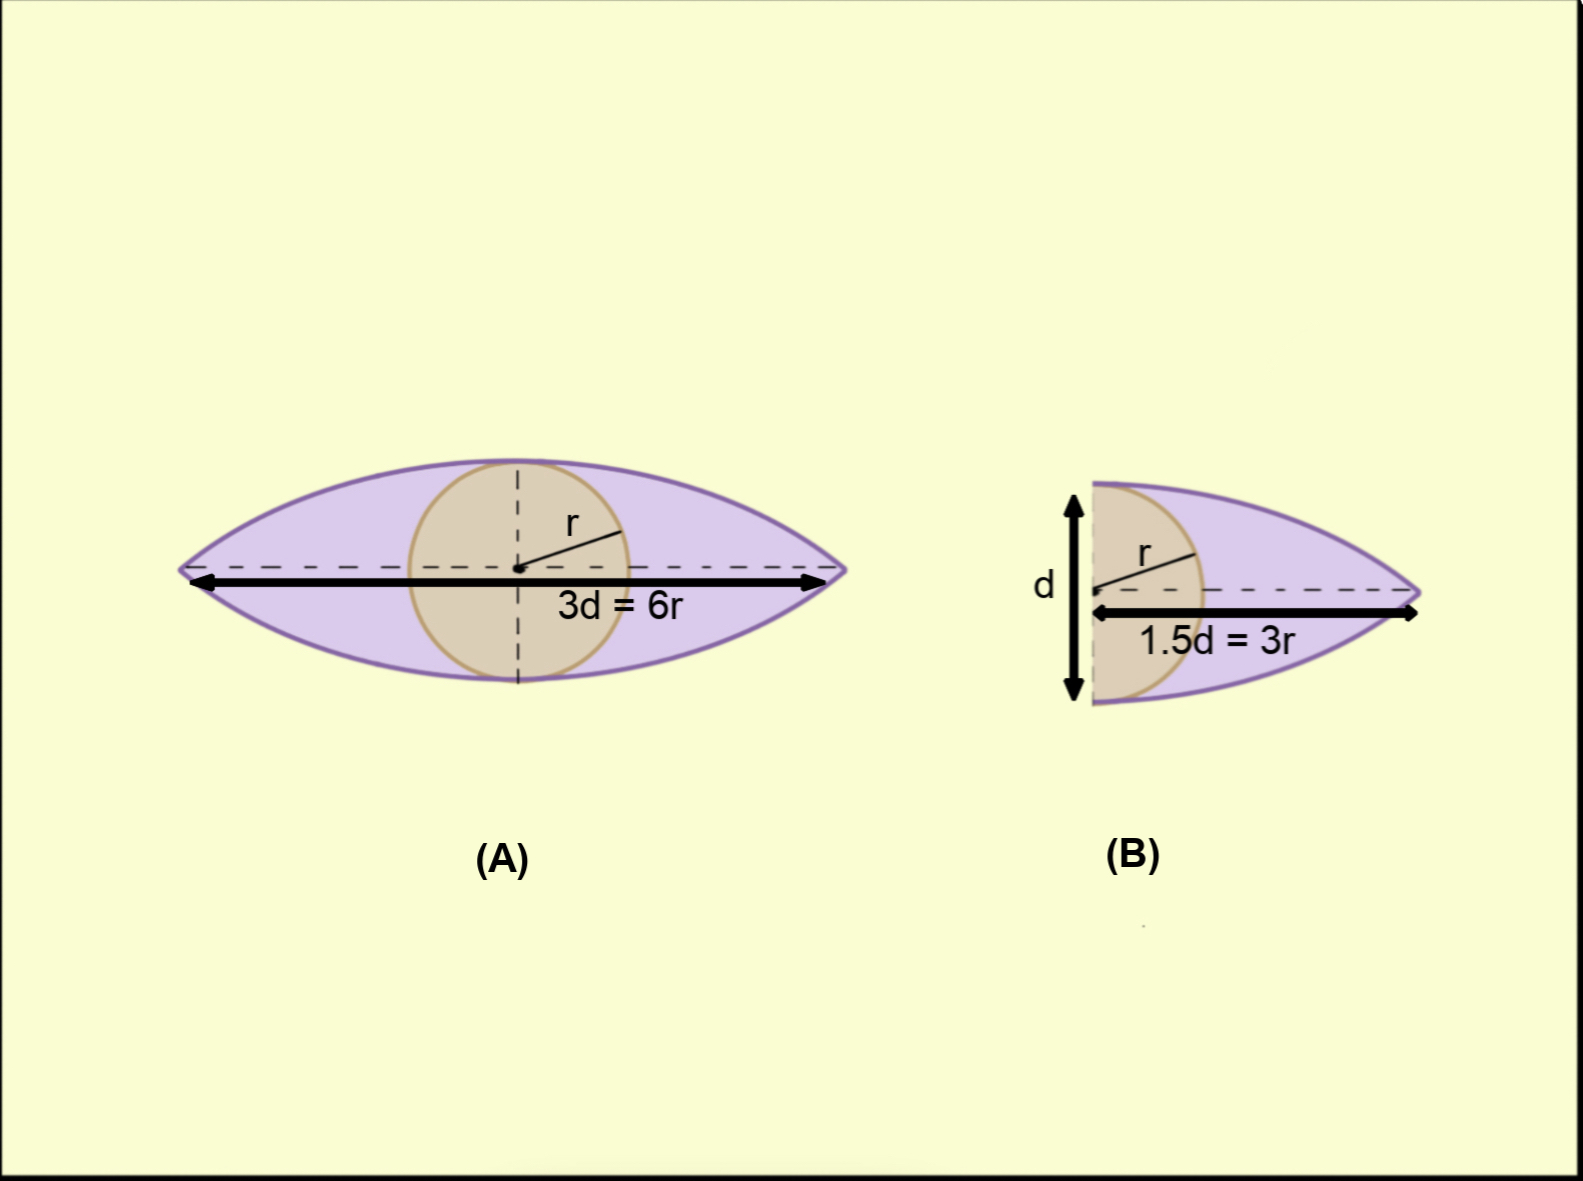
Figure 5. Principle of the closure of an elliptical defect. (A) A circular defect with an 'r' radius is shown. An ellipse is drawn with width d = 2r. For a closure without dog-ear formation, the length should be equal to 3 times its width. (B) Similarly, a semicircle defect with an 'r' radius will need a 1.5d or 3r length of hemi-ellipse to avoid dog-ear.
Drawing of two circles touching each other
In a bilobed flap, the primary circular flap lies in touch with the circular defect. Figure 6 shows 2 equal circles with centers A and B having equal radius 'r' located at a distance of 'R' from a common point (D). The angle between AD and BD is θ. The distance (R) at which these 2 circles will touch each other can be given by the following formula (LaTeX expression: R=r\cdot \frac{1}{\sin\left(\frac{\theta }{2}\right)} ).
R = r . 1/ sin(θ/2)
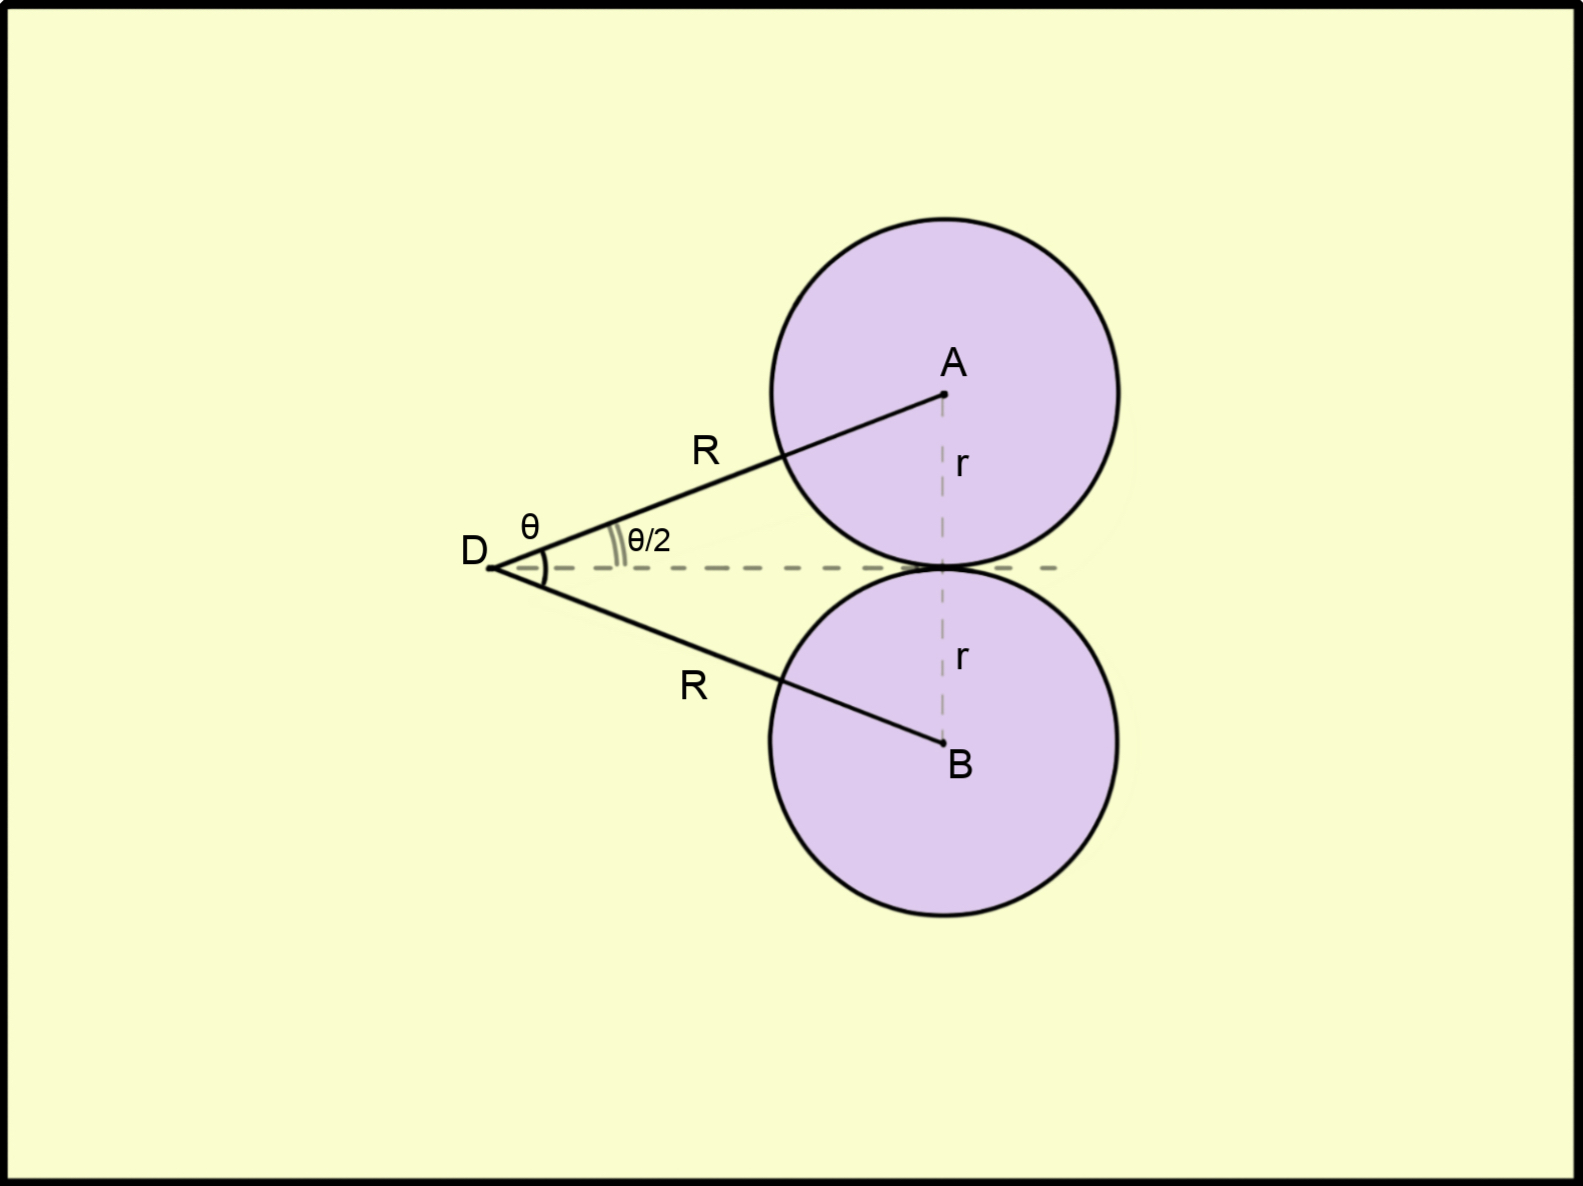
Figure 6. The principle of planning 2 circular flaps with equal radius 'r' adjacent to each other is depicted in the figure. The circles are located at an equal distance of 'R' from a common point and form angle θ. There is a precise mathematical equation that gives the relationship between r, R, and the angle θ.
The key movement during bilobed flap transposition
As already discussed, the pivot point as well as the base of a transposition flap remain static. It can be seen in the basic design of the bilobed flap (Figures 2 and 7A) that the base of the flap is advanced or rotated along a point near the defect. It is this movement that results in final transposition of both lobes of a bilobed flap to their final destination (as explained in subsequent sections).
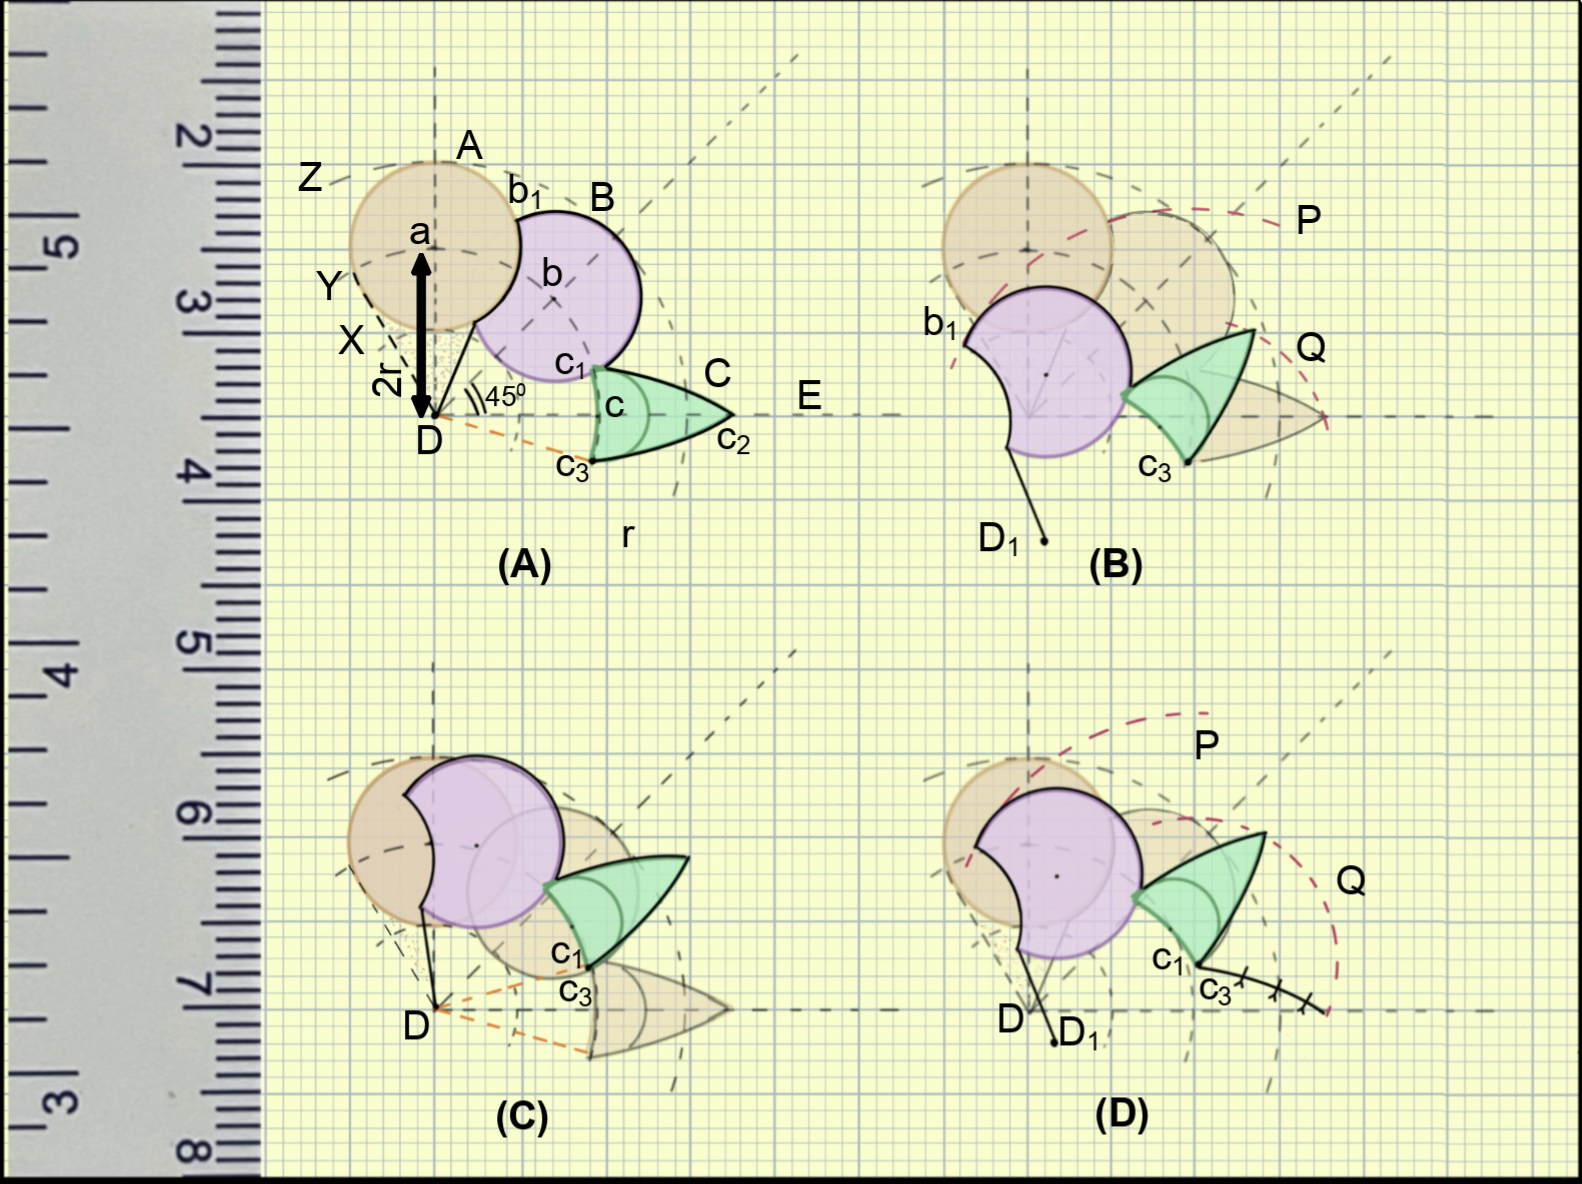
Figure 7. An illustration of the movement of the bilobed flap. (A) A classic design of Zitelli bilobed flap with exact measurements. The base of the flap (Dc3) is also marked. (B) Transposition along the pivot point 'c3' with primary and secondary flap move along the arc 'P' and 'Q', respectively. The transposed flap is too far from the defect. (C) Rotation along the pivot point 'D' with base moves to a new position. The primary flap is not reaching the defect. (D) Even with combined rotation and transposition, the primary flap does not reach the desired position, and the secondary flap is too narrow for the primary flap defect.
Transposition of the classic bilobed flap (with exact measurement)
As illustrated in Figure 7A, the dotted line 'Dc3' represents the base of the bilobed flap. Point 'b1' is the most distant point of the primary flap from point 'c3,' and point 'c2' is the most distant part of the secondary flap from point 'c3.' The arcs 'P' and 'Q' are drawn from the center (c3, pivot point) and represent the arc along which the primary and secondary flaps move during transposition. If we consider the bilobed flap as a pure transposition flap, ie, the pivot point remains stable, the resultant transposed flap will fall remarkably short (Figure 7B).
However, as discussed above, a bilobed flap also has a rotation or advancement component. During the closure of the secondary flap defect of the bilobed flap, the bilobed flap base (Dc3) is rotated along a pivot point (D) to a new position such that 'c3' and 'c1' overlap. As shown in Figure 7C, after only rotation movement, the flaps do not reach the desired location. A component of transposition will be needed, and this transposition will happen along the pivot point 'c1' (and on 'c3' as they are the same after rotation). As shown in Figure 7D, even on transposition after rotation, the flap will fall short.
Results
If a bilobed flap is drawn with exact measurements as detailed, the following results can be noted:
- The primary flap will overlap the defect, and the width of the secondary flap will be half of the primary flap.
- Only on transposition at 45° will both flaps never reach the desired place.
- With only advancement of the flap base, both flaps will fall short.
- With the addition of both advancement and transposition, the primary flap still falls short of the defect, and more so if it is planned smaller than the defect. Moreover, it can also be noticed that the secondary flap is too small to fit into the defect of the primary flap. Any attempt to give inset to both flaps will result in significant tension at the margins.
- If we closely observe (Figure 7D), the line along the margin of the primary flap adjacent to the defect is moved, and the original center of planning (point 'D') is moved to the 'D1' point. It indicates that a standing cutaneous deformity will be formed once the flaps are transposed after rotation.
- If. the length of semicircular secondary flap is not extended for an additional 2r distance, a standing cutaneous deformity (dog-ear) will occur.
All these drawbacks indicate inherent mathematical errors in the description of the bilobed flap. If a bilobed flap is redesigned with sound mathematical principles, these errors can be theoretically eliminated.
A mathematically precise design
The overlapping of the primary flap and defect in the bilobed flap (with exact measurements) is due to the short 'aD' distance. The Table shows the value of 'aD' (equivalent to R in Figure 6) for various angles between defect and flap based on the above-mentioned equation. For aD = 2r, the angle between the defect and the primary flap should be 60° to avoid overlapping. For θ = 45°, the distance should be 2.6r; that is, for planning bilobed flap, if 'aD' is kept at 2.6r instead of 2r, the defect and primary flap will not overlap each other.

Table. A table showing the relationship between distance (R) and angle (θ) formed on a common point by the center of 2 equivalent circles (radius = r), whereas the 2 circles touch each other without overlapping.
Figure 8 shows the proposed new plan for designing the bilobed flap (with 45° angle). The planning steps are exactly the same as for the classic bilobed flap design mentioned in the Method section, except the distance 'aD' is 2.6 times radius (2.6r) instead of 2 times, and the secondary flap width is the same as of the defect, but its length is extended for an additional distance equivalent to twice the radius (2r).
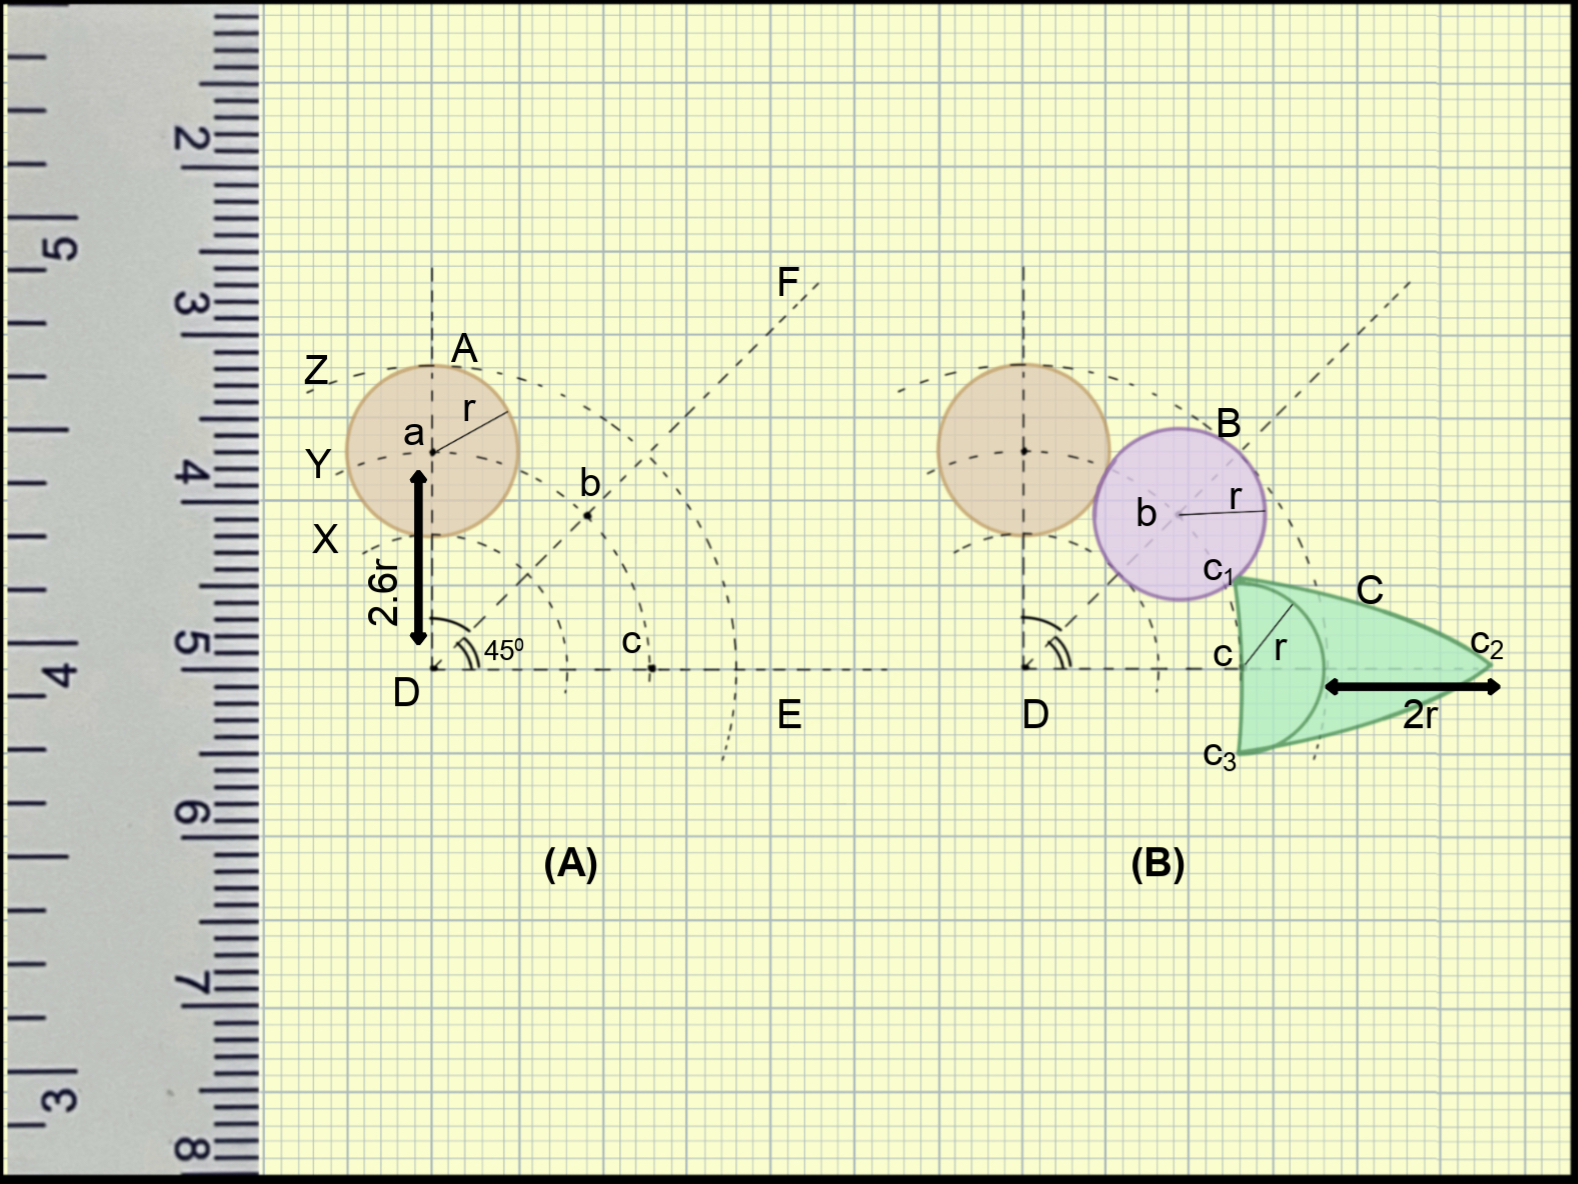
Figure 8. An illustration of a new modification in the design of the Zitelli bilobed flap. (A) The pivot point is located at a 2.6r distance instead of 2r. (B) With proper pivot point location, the primary flap does not overlap the defect. The secondary flap can be extended to an additional 2r length to facilitate primary closure without dog-ear formation.
If a bilobed flap is planned like this, it will look like Figures 8B and 9A. If the base of this flap (Dc3) is rotated to its new position (Dc1), both flaps will fall automatically into the desired position without a need for transposition (Figure 9B). It can be observed that the point 'D' will be at its same position, so there will be no standing cutaneous deformity. Furthermore, as the flaps are at their final location, there will be no tension in the closure line.
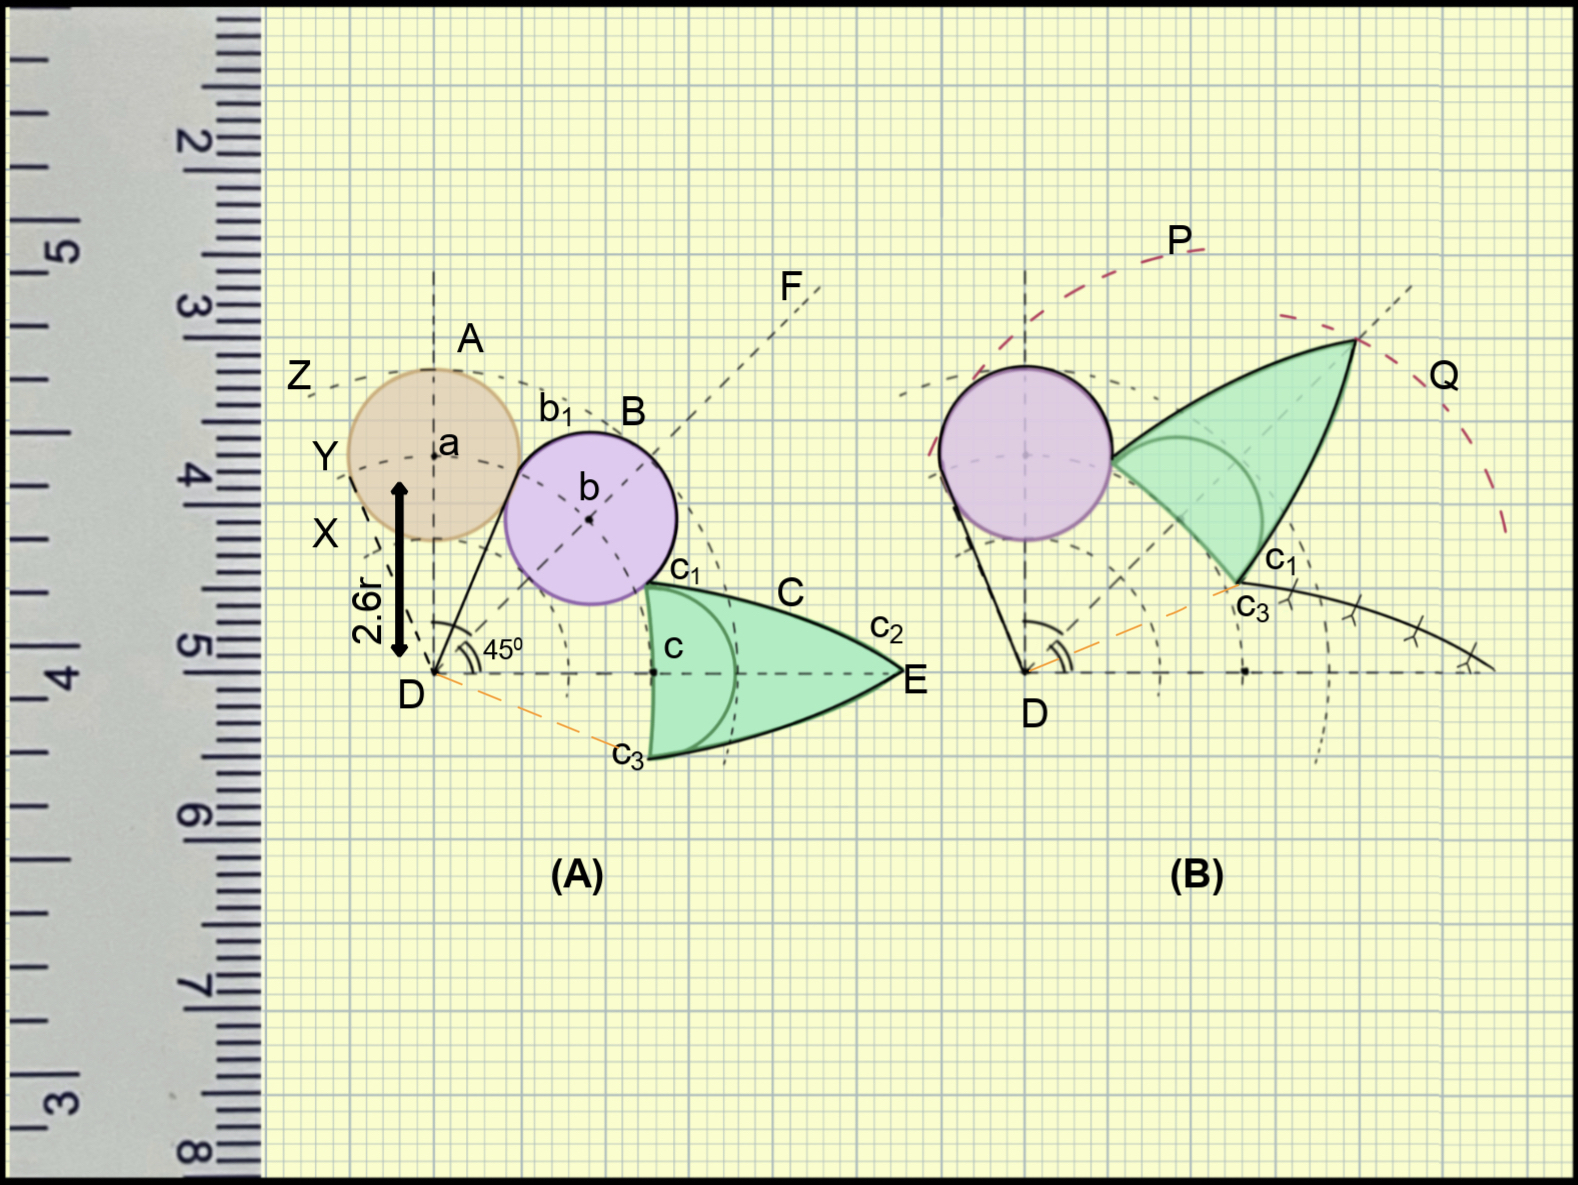
Figure 9. An illustration of the movement of the new modified bilobed flap. (A) Outline of the incision. (B) A perfect overlapping of the primary lobe and the defect after rotation of the base 'Dc' to new position 'Dc'. There is no need for transposition movement. Also, the secondary flap fits precisely on the primary flap defect area. The extended part will be discarded, so the extension is not necessary for the secondary flap.
Discussion
The bilobed flap is one of the important tools for nasal reconstruction. The original description of Esser has undergone several modifications, and Zitelli made the most significant contribution.3,5 The complex biomechanics of this flap have been described variously in literature. Apart from the most common description of double transposition flap, it has also been described as modified Z-plasty and a modified rotation flap.7,8
The bilobed flap is particularly useful for the coverage of the defect located at the lower third of the nose. The skin of the lower third of the nose is more closely adherent to the underlying structure than the upper two thirds.8 The bilobed flap can be designed in such a way that it will recruit skin from the cheek, a more lax area, rather than solely from the nasal skin. In addition, the bilobed flap provides greater distribution of wound closure tension, which in turn decreases the chances of distortion of the nasal structures. Primary closure of the donor defect is another advantage over a single transposition that requires a skin grafting of the donor area. Being a local flap, it carries all the advantages of a local flap like texture matching, color matching, and replacing like with like.
The bilobed flap does carry some drawbacks. The scar of the bilobed flap is not parallel to the relaxed skin tension line, and thus is more noticeable. Trap door deformity, contour deformity, and nasal distortion are other disadvantages.1 Elongation of the flap, wide undermining of the recipient site, thinning of the primary flap, and designing the flap in rhomboid or rectangle shapes are some of the maneuvers that have been described to reduce these disadvantages.6,7
Once a proper flap is designed, the key movement is rotation along the base of the flap. There should be laxity of the skin near the base, and it should be tested clinically prior to planning. All the tension will lie on the secondary flap closure line. The bilobed flap must be designed in such a way that the secondary flap is marked on the lax area. For this, the location of the pivot point from the center of the defect should be in the direction opposite but parallel to the direction of the skin laxity (Figures 10A and 10B).
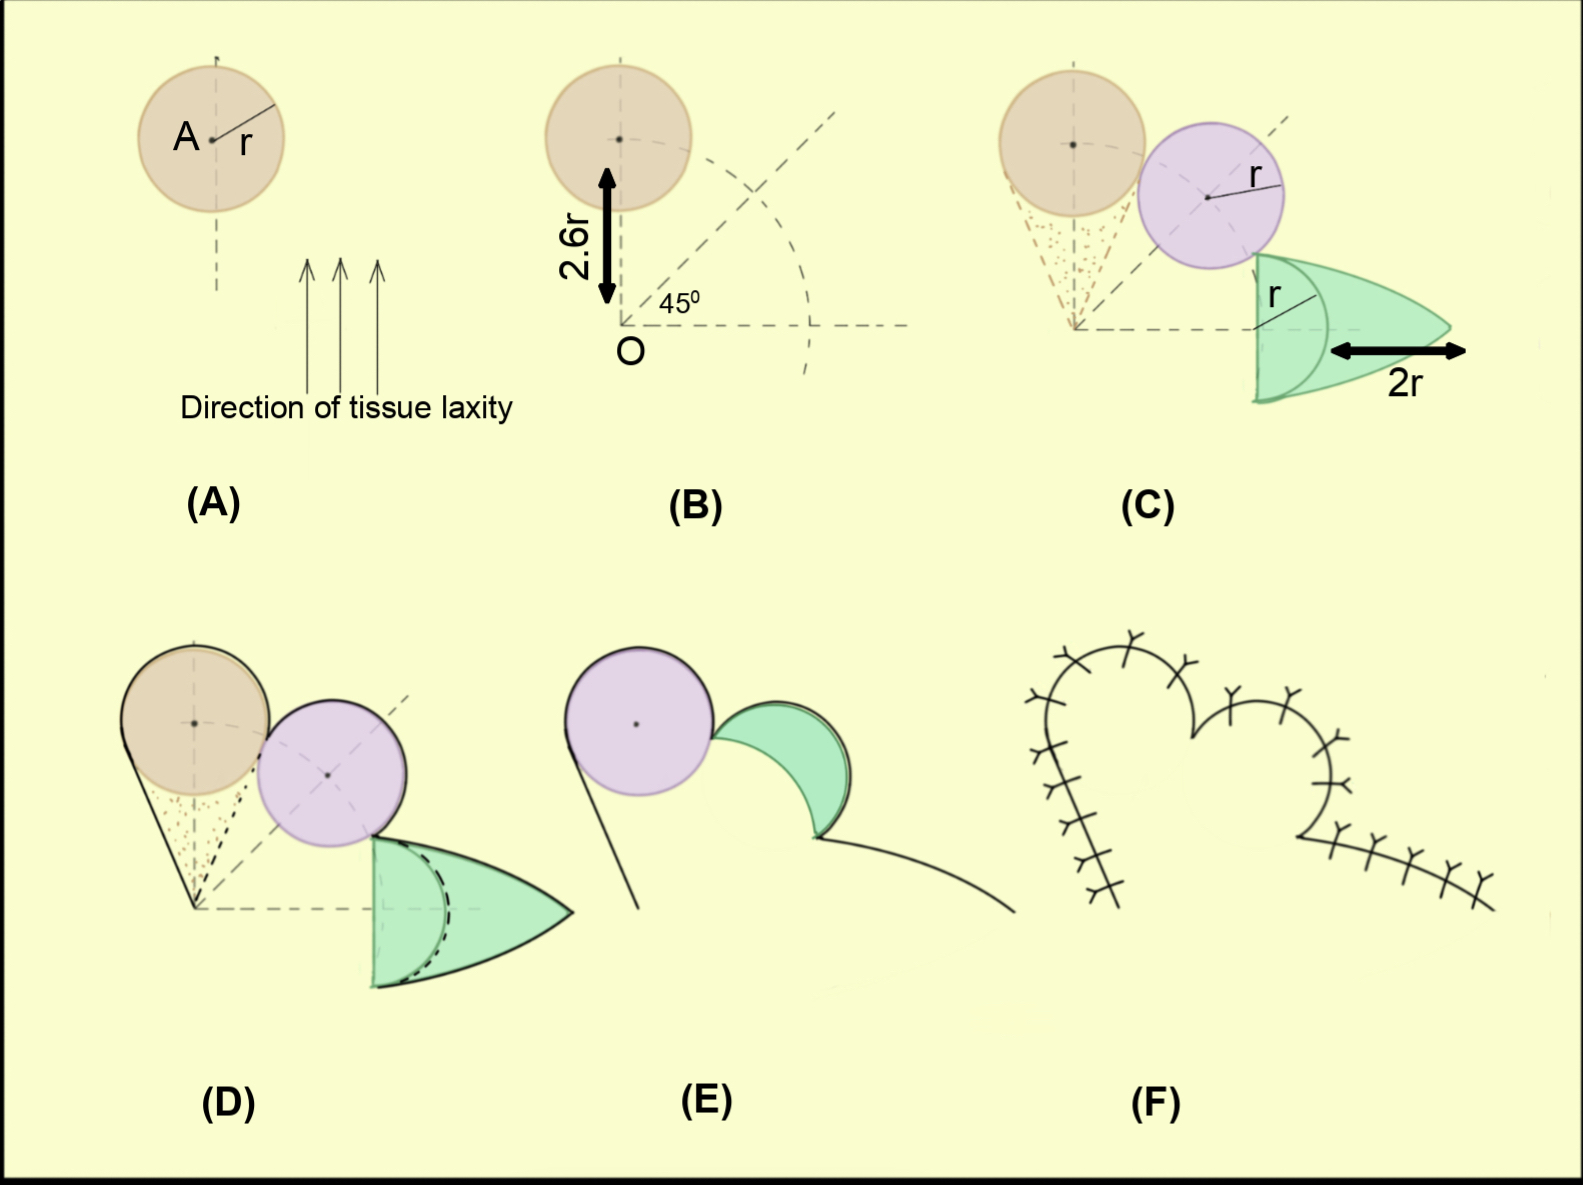
Figure 10. Steps of designing the new modified Zitelli bilobed flap. (A) Circular defect with 'r' radius. The direction along which skin can be pulled easily is also depicted. (B) The pivot point is located at a 2.6r distance. The location of the pivot point from the defect is opposite to the direction of skin laxity. (C) Two flaps are planned. Both flaps are equal to the defect with an optional extension of secondary flap length to an additional 2r. (D) Incision includes a triangle of skin near the defect, which will be discarded. (E) Flap inset. If the secondary flap is extended, that part must be discarded. (F) Final scar line.
If the pivot point is kept at a 2.6r distance, the primary flap will not overlap the defect, and the secondary flap will fit well in the primary flap donor area (Figures 10B and 10C). The extension of the secondary flap is needed only to avoid a dog-ear deformity during the closure of its donor area. This extension may be avoided, and the standing cutaneous deformity can be dealt with separately, either at the end of the flap inset or later as a secondary correction. In a properly designed bilobed flap, only rotation of the flap base is sufficient to make the flaps fall to their final destination (Figures 10C-10F).
Recommended steps
The steps for the new design of the bilobed flap are summarized (Figure 10) below:
- Mark the proposed circular defect and mark the center (A). Measure its radius (r).
- Look for the maximally mobile tissue and its direction. From the center of the defect (A), draw a line in a direction opposite but parallel to the direction of tissue mobility.
- On the line, mark a point 'O' from the center of the defect at a distance of 2.6 times the radius of the defect (OA = 2.6r).
- Make two lines from 'O' at 45° and 90° to the first line.
- Draw an arc from the point 'O' passing through the center of the defect.
- The intersecting point of the arc and the 45-degree angle line will be the center of the primary flap. The primary flap is drawn around this center with a radius equal to the radius of the defect.
- The secondary flap is drawn as a semicircle around the intersecting point of the arc and the 90-degree line. Extend this secondary flap for twice the radius of the defect to facilitate the closure (though the flap can be marked without this extension, and the standing cutaneous deformity can be corrected later).
- Cuts are made (including the triangular skin wedge between the defect and the pivot point O) and the flaps are raised. Undermine the flap base so that base can be rotated and primary closure of the defect of secondary flap can occur. Once it is done, both flaps will automatically fall into their final destination, and the closure can be performed without tension and standing cutaneous deformity formation.
Limitations
The limitations of this study include the absence of clinical or cadaveric validation. As the research primarily focuses on theoretical and mathematical aspects, there may be variations in the result. Further validation through practical experiments or clinical trials is warranted to assess the actual efficacy of the proposed surgical process in clinical settings. Extending the radius to 2.6r shifts the flap to a larger area. So, in clinical conditions where soft tissue limitation is present, this extension is feasible only for a smaller defect. Furthermore, anatomic surfaces like the nose are not flat surfaces. Mathematical analysis of flap movement on such 3D surfaces is beyond the scope of this article. While acknowledging the limitations of this study, fellow practitioners are encouraged to consider integrating the proposed surgical process into their clinical practice and provide feedback.
Conclusions
The bilobed flap is one of the effective tools for nasal reconstruction, particularly for lower third nasal defects. This article provides insight into the mathematical principles behind the design of a bilobed flap. A proper pivot point location is the key to perfect flap geometry. A mathematically precise bilobed flap requires only a rotation movement. However, this article proposes a theoretical description, which needs to be tested clinically. The effectiveness of this new bilobed flap design will be determined by long-term studies on humans.
References
1. Jiao X, Cui C, Ng SK, et al. The modified bilobed flap for reconstructing sacral decubitus ulcers. Burns Trauma. 2020;8:tkaa012. Published 2020 Dec 12. doi:10.1093/burnst/tkaa012
2. Kelly-Sell M, Hollmig ST, Cook J. The superiorly based bilobed flap for nasal reconstruction. J Am Acad Dermatol. 2018;78(2):370-376. doi:10.1016/j.jaad.2017.09.014
3. Zitelli JA. The bilobed flap for nasal reconstruction. Arch Dermatol. 1989;125:957-959.
4. Dzubow LM. The dynamics of flap movement: effect of pivotal restraint on flap rotation and transposition. J Dermatol Surg Oncol. 1987;13(12):1348-1353. doi:10.1111/j.1524-4725.1987.tb03581.x
5. Wang ZG, Chen XJ, Chen ZY. A modified bilobed flap design for nasal tip defects. Plast Aesthet Res. 2014;1:16-20.
6. Cho M, Kim DW. Modification of the Zitelli bilobed flap: a comparison of flap dynamics in human cadavers. Arch Facial Plast Surg. 2006;8(6):404-410. doi:10.1001/archfaci.8.6.404
7. Cook JL. A review of the bilobed flap's design with particular emphasis on the minimization of alar displacement. Dermatol Surg. 2000;26(4):354-362. doi:10.1046/j.1524-4725.2000.99160.x
8. Baker, SR. Bilobed flap. In Baker SR, ed. Local Flaps in Facial Reconstruction. 3rd ed. Elsevier Saunders; 2014.